Out Of Stock
Description
Full integration on one board: Uno R3 ATmega 328 and WiFi ESP8266 with memory 32Mb (MegaByte). All of the modules can work together or each separately. And everyone has their own pinout headers.
The convenient solution for the development of new projects requiring Uno and WiFi. Via USB you can update sketches and firmware for ATmega328 and for ESP8266. For this it has a USB-serial converter ch340G. it is so simple to use this board and it has DIP-switch, to connect the modules.
For example, to: USB and ATmega328, USB and ESP8266, ATmega328 and ESP8266.
Table DIP- switch:
| Connection | DIP | ||||||
| 1 | 2 | 3 | 4 | 5 | 6 | 7 | |
| ATmega328<->ESP8266 | ON | ON | OFF | OFF | OFF | OFF | OFF |
| USB <->ATmega328 | OFF | OFF | ON | ON | OFF | OFF | OFF |
| USB<->ESP8266 (Update firmware or sketch) | OFF | OFF | OFF | OFF | ON | ON | ON |
| USB<->ESP8266 (communication) | OFF | OFF | OFF | OFF | ON | ON | OFF |
| All independent | OFF | OFF | OFF | OFF | OFF | OFF | OFF |
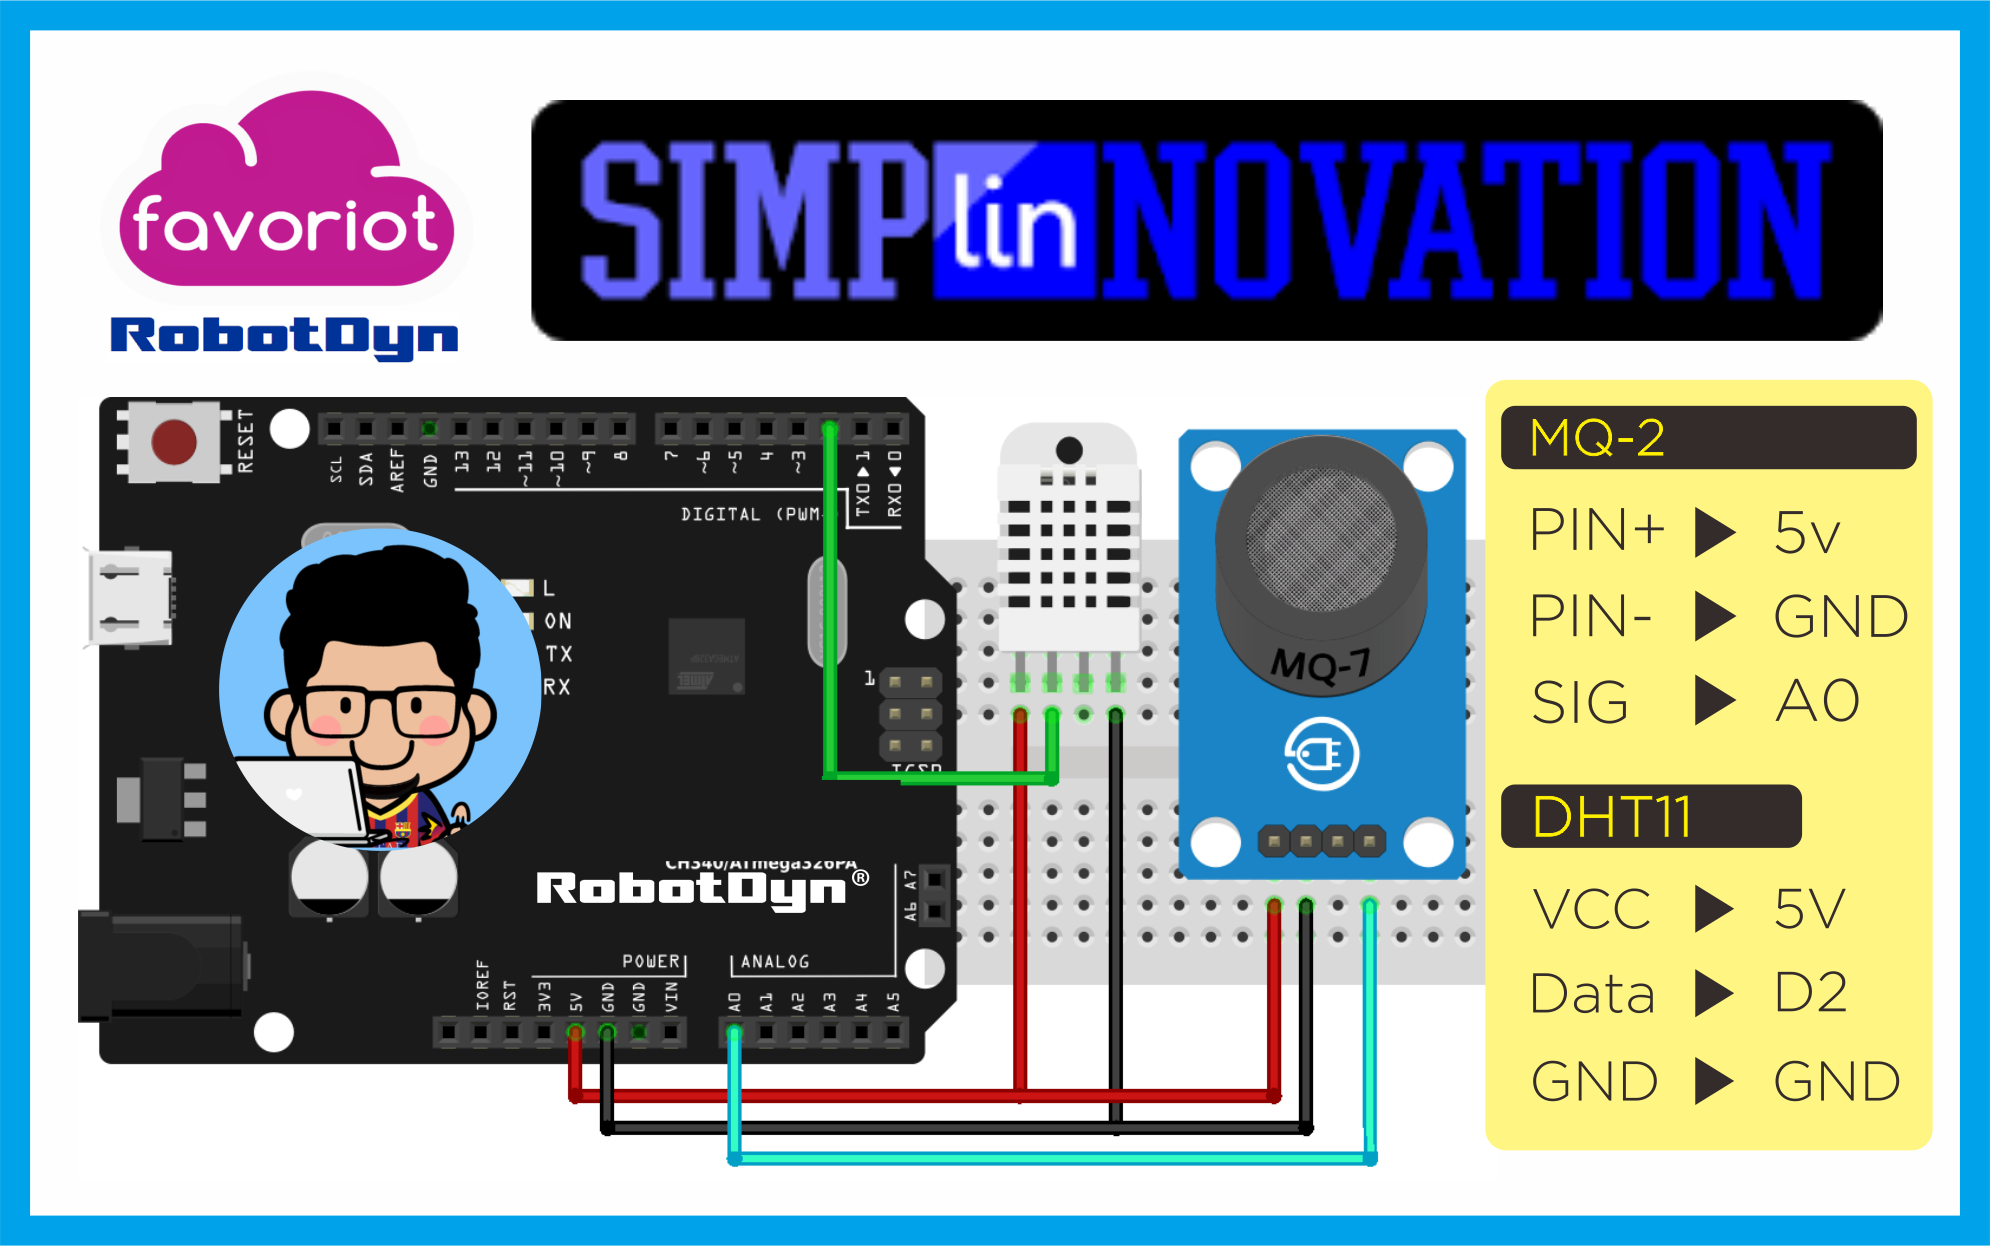
A simple IoT test, uploading multiple data sensors: DHT22 (temperature & humidity) & MQ-2 (gas sensor) from RobotDyn Uno+WiFi to Favoriot
1. What You Need
To build this project, you need the following items:
- 1 RobotDyn Uno+WiFi board
- 1 Breadboard
- 1 MQ-2 gas sensor
- 1 DHT22 temperature & humidity sensor
- some jumper wires
- Arduino IDE (download here)
2. Schematics
Gather your parts then follow the schematics below.
3. Favoriot Setup
Device Developer ID
Signup & login to Favoriot. If you are registered in Favoriot, you have a default device already created for you. Go to right platform on https://platform.favoriot.com and see the device panel to see the devices that are present. Basically you need the
device_developer_idthat might be something likedefaultDevice@myusername. But if you want, you can create a new device and use it in this example.API Key
Now, go to your Favoriot Account Setting which is available on the top right corner in the dropdown and check your API key. You need this API key to complete this example. It's a big alphanumeric token like:
'986673a6377ef1fde2357ebdcb0da582lintang150b00cabcd5a0d83045425407ab4'
4. Arduino Sketch
First you need to install ESP8266 platform on Arduino IDE, follow these instructions: click here. Copy sketch below to your Arduino IDE. Make sure you have chosen the right option for Board and Port under Tools menu, then upload to your Arduino board.
#include <SPI.h>
#include <ESP8266WiFi.h>
#include <dht.h>
dht DHT;
#define DHT22_PIN 2

char ssid[] = "your_network_SSID";      // change it!
char pass[] = "your_network_password";  // change it!
const String yourDevice = "deviceDefault@your_Username"; // change it!
int status = WL_IDLE_STATUS;
char server[] = "api.favoriot.com";
WiFiClient client;

void setup() {
  Serial.begin(115200);
  pinMode(2,INPUT);
  WiFi.disconnect();
  Serial.println("Mulai menghubungkan");
  WiFi.begin(ssid,pass);
  while((!(WiFi.status() == WL_CONNECTED))){
    delay(300);
    Serial.print("...");
  }
  Serial.println(WiFi.status());
  Serial.println("Terhubung");
  Serial.println("");
}

void loop() {
  int chk = DHT.read22(DHT22_PIN);
  String suhu = String(DHT.temperature, 1);
  String lembab = String(DHT.humidity, 1);
  String gas = String(map(analogRead(A0),0,1024,100,0));

  String json = "{\"device_developer_id\":\""+yourDevice+"\",\"data\":{\"Suhu\":\""+suhu+"\",\"Kelembaban\":\""+lembab+"\",\"Gas\":\""+gas+"\"}}";
  Serial.println(json);
  if (client.connect(server, 80)) {
    client.println("POST /v1/streams HTTP/1.1");
    client.println("Host: api.favoriot.com");
    client.println(F("apikey: your_API_key"));  // change it!
    client.println("Content-Type: application/json");
    client.println("cache-control: no-cache");
    client.print("Content-Length: ");
    int thisLength = json.length();
    client.println(thisLength);
    client.println("Connection: close");
    client.println();
    client.println(json);
  }

  while (client.available()) {
    char c = client.read();
    Serial.write(c);
  }

  if (!client.connected()) {
    client.stop();
  }

  delay(5000);
}
Now you can monitor your MQ-2 & DHT22 every 5 seconds on Favoriot dashboard.