Out Of Stock
Description
HuskyLens AI Machine Vision Sensor is a camera-based device that provides advanced machine vision capabilities for various applications. It features an onboard AI processor that can perform image recognition, object tracking, and other complex tasks in real time without requiring a separate computer or microcontroller. The device can be easily configured and programmed using a graphical user interface (GUI) or a programming language like Python. It also supports various communication protocols like UART, I2C, and SPI, making it compatible with various devices and systems. the HuskyLens AI Machine Vision Sensor is a powerful and versatile tool for developers, hobbyists, and professionals looking to add advanced vision capabilities to their projects.
Package Includes:
- 1 x HuskyLens AI Machine Vision Sensor
Features:
- AI Processor: The device features an onboard AI processor that allows it to perform complex visual tasks such as image recognition and object tracking in real time.
- 2.0-inch TFT LCD Display: The device has a 2.0-inch TFT LCD display that provides a live view of the camera feed, making it easy to configure and adjust settings.
- Programmable: The device can be easily programmed using a graphical user interface (GUI) or a programming language like Python. This allows developers to create custom vision algorithms and configure triggers and events to meet their specific needs.
- Multiple Communication Protocols: The device supports multiple communication protocols including UART, I2C, and SPI, making it compatible with various devices and systems.
- Compact Size: The device is compact in size, making it easy to integrate into existing projects and systems.
- Easy to Use: The device is easy to use, with a user-friendly interface that allows for easy configuration and adjustment of settings.
- High-Quality Camera: The device features a high-quality camera that captures clear and detailed images.
- Object Tracking: The device can track objects in real time, making it ideal for applications such as robotics and automation.
- Voice Feedback: The device has a built-in microphone and speaker, which can be used to provide voice feedback or sound-based triggers for events or actions.
- Open-Source Software: The device's software is open-source, allowing developers to customize and modify it to suit their specific needs.
Description:
The HuskyLens AI Machine Vision Sensor is a compact camera-based device that offers advanced machine vision capabilities for a wide range of applications. It's equipped with an onboard AI processor that allows it to perform image recognition, object tracking, and other complex tasks in real time, without the need for an external computer or microcontroller. This makes it an ideal tool for developers, hobbyists, and professionals who want to add advanced vision capabilities to their projects without the complexity of traditional computer vision systems. The device features a 2.0-inch TFT LCD display that provides a live view of the camera feed, making it easy to configure and adjust settings. It also has a built-in microphone and speaker, which can be used to provide voice feedback or sound-based triggers for events or actions. The HuskyLens AI Machine Vision Sensor is highly customizable and can be programmed using a graphical user interface (GUI) or a programming language like Python. This allows developers to create custom vision algorithms, adjust settings, and configure triggers and events to meet their specific needs. The device also supports various communication protocols, including UART, I2C, and SPI, making it compatible with various devices and systems. This allows it to integrate easily into existing projects and systems and enables developers to communicate with the device using their preferred protocol.
Principle of Work:
The principle of operation for the HuskyLens AI Machine Vision Sensor is based on machine learning and computer vision techniques. The device is equipped with an onboard AI processor that is capable of performing complex vision tasks such as image recognition, object tracking, and other machine learning-based algorithms. The device captures images and video in real-time using a high-quality camera and then processes this data using its onboard AI processor. The AI processor uses machine learning algorithms to analyze the images and extract relevant information, such as object size, shape, color, and location. The device can then use this information to perform various tasks, such as object tracking or recognition, which can be customized and programmed by the user using a graphical user interface (GUI) or a programming language like Python. The HuskyLens AI Machine Vision Sensor can also be configured to trigger events or actions based on certain conditions, such as detecting a specific object or pattern in the camera feed. This makes it ideal for a wide range of applications, including robotics, automation, surveillance, and more.
Pinout of the Module:
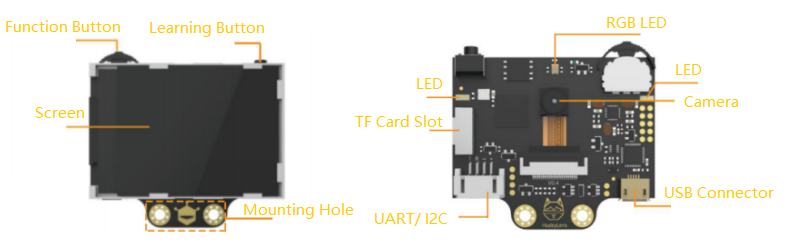
Overview of the pinout and onboard components of the HuskyLens AI Machine Vision Sensor:
- Power Supply: The device can be powered via a micro-USB port or using an external power supply. It operates on a voltage of 5V.
- Communication Interfaces: The HuskyLens AI Machine Vision Sensor supports multiple communication protocols including UART, I2C, and SPI. It also has a microSD card slot for storing data.
- Camera: The device features a high-quality camera that captures images and video in real time.
- TFT LCD Display: The device has a 2.0-inch TFT LCD display that provides a live view of the camera feed, making it easy to configure and adjust settings.
- AI Processor: The device is equipped with an onboard AI processor that allows it to perform complex visual tasks such as image recognition and object tracking in real time.
- Microphone and Speaker: The device has a built-in microphone and speaker, which can be used to provide voice feedback or sound-based triggers for events or actions.
- Microcontroller: The device features an STM32 microcontroller, which provides additional processing power and support for various communication protocols.
- LED Indicators: The device has several LED indicators that provide feedback on the status of the device, such as power status and communication activity.
- Reset Button: The device has a reset button that can be used to reset the device to its default settings.
And for the UART connections pinout:
| Num | Label | Pin Function | Description |
|---|---|---|---|
| 1 | T | TX | TX pin of HuskyLens |
| 2 | R | RX | RX pin of HuskyLens |
| 3 | - | GND | Negative (0V) |
| 4 | + | VCC | Positive (3.3~5.0V) |
Applications:
- Robotics: The device can be used in robotics projects for object tracking, obstacle detection, and navigation.
- Automation: The device can be used in automated systems for quality control, inspection, and sorting.
- Surveillance: The device can be used in surveillance systems for motion detection and facial recognition.
- Home Automation: The device can be used in home automation projects for controlling appliances and monitoring activities.
- Education: The device can be used in educational projects for teaching computer vision and machine learning concepts.
- Entertainment: The device can be used in gaming and entertainment applications for gesture recognition and object tracking.
- Agriculture: The device can be used in agricultural applications for plant health monitoring and crop analysis.
- Healthcare: The device can be used in healthcare applications for medical imaging and patient monitoring.
Circuit: 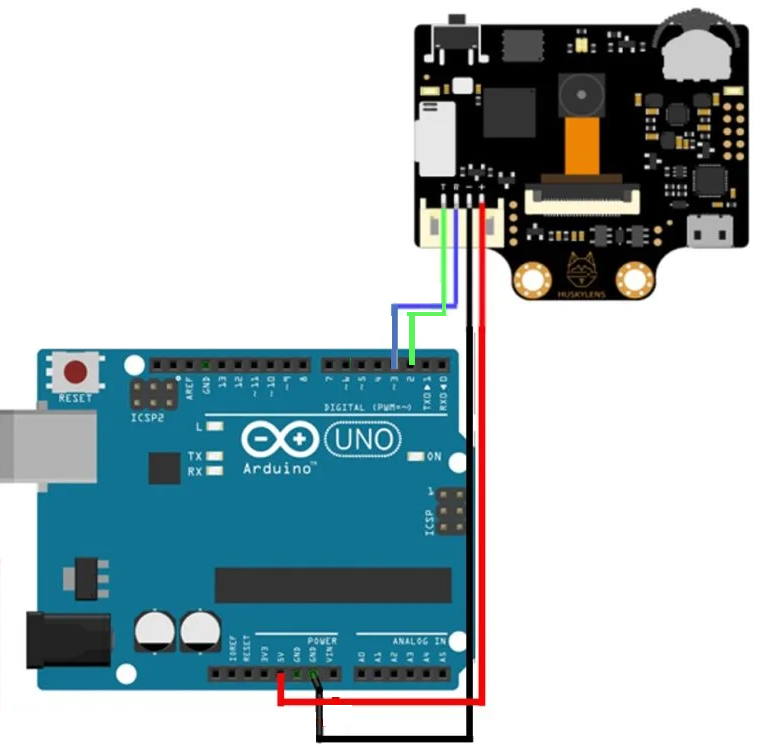
- Connect the GND pin on the HUSKYLENS sensor to a GND pin on the Arduino board.
- Connect the 5V pin on the HUSKYLENS sensor to the 5V pin on the Arduino board.
- Connect the TX pin on the HUSKYLENS sensor to a digital pin (e.g. pin 2) on the Arduino board.
- Connect the RX pin on the HUSKYLENS sensor to a digital pin (e.g. pin 3) on the Arduino board.
Note: It is important to connect the TX pin on the HUSKYLENS sensor to a digital pin on the Arduino board, rather than the RX pin. This is because the HUSKYLENS sensor transmits data to the Arduino board, so the TX pin on the sensor should be connected to the RX pin on the Arduino board.
Library:
- Download the HUSKYLENS library from the Seeed Studio GitHub page: https://github.com/Seeed-Studio/HUSKYLENS_Arduino_Library
- Open the Arduino IDE and navigate to Sketch > Include Library > Add .ZIP Library
- Select the downloaded HUSKYLENS library .zip file and click Open
- The library should now be installed and ready to use
Code:
This code is an example of how to use the HUSKYLENS library to communicate with the HUSKYLENS AI Machine Vision Sensor and get the position and size of detected objects.
After installing the library, you can upload the sample code to your Arduino board and open the serial monitor to view the output. When the HUSKYLENS sensor detects an object, you should see data printed to the serial monitor in the format specified in the code.
#include "HUSKYLENS.h"

HUSKYLENS huskylens;

void setup() {
  Serial.begin(9600);
  huskylens.begin(Serial);
}

void loop() {
  if (huskylens.request()) {
    if (huskylens.available()) {
      HUSKYLENSResult result = huskylens.read();
      if (result.command == COMMAND_RETURN_BLOCK) {
        Serial.print("ID: ");
        Serial.print(result.ID);
        Serial.print(", X: ");
        Serial.print(result.xCenter);
        Serial.print(", Y: ");
        Serial.print(result.yCenter);
        Serial.print(", Width: ");
        Serial.print(result.width);
        Serial.print(", Height: ");
        Serial.println(result.height);
      }
    }
  }
}
-
In the
setup()function, the code initializes the serial communication with the Arduino board at a baud rate of 9600 and then initializes the HUSKYLENS object using thebegin()function. Thebegin()function takes one argument, which is the serial port object used for communication. -
In the
loop()function, the code first checks if a request for data has been sent to the HUSKYLENS sensor using therequest()function. If the request is successful, the code then checks if data is available to read from the HUSKYLENS sensor using theavailable()function. -
If data is available, the code reads the data using the
read()function, which returns an object of the typeHUSKYLENSResult. The code then checks if thecommandvalue of theHUSKYLENSResultthe object is equal toCOMMAND_RETURN_BLOCK, which means that the object contains data about a detected object. -
If the command is
COMMAND_RETURN_BLOCK, the code outputs the ID, X and Y coordinates, width, and height of the detected object to the serial monitor using theSerial.print()andSerial.println()functions.
Technical Details:
- Processor: Kendryte K210
- Image Sensor: OV2640 (2.0Megapixel Camera)
- Supply Voltage: 3.3~5.0V
- Current Consumption(TYP): [email protected] , [email protected] (face recognition mode; 80% backlight brightness; fill light off)
- Communication Port: UART; I2C
- Display: 2.0-inch IPS screen with 320*240 resolution
- Built-in Algorithms: Face Recognition, Object Tracking, Object Recognition, Line Tracking, Color Recognition, Tag Recognition, Object Classification
- Dimension: 52mm x 44.5mm (2.05*1.75 inch)
Resources:
- Latest Firmware:V0.5.1a
- tutorial
- History Version Firmware(github)
- Arduino Library(github)
- micro:bit Makecode Library(github)
- Protocol Document
- Tag Pictures(More than 500)
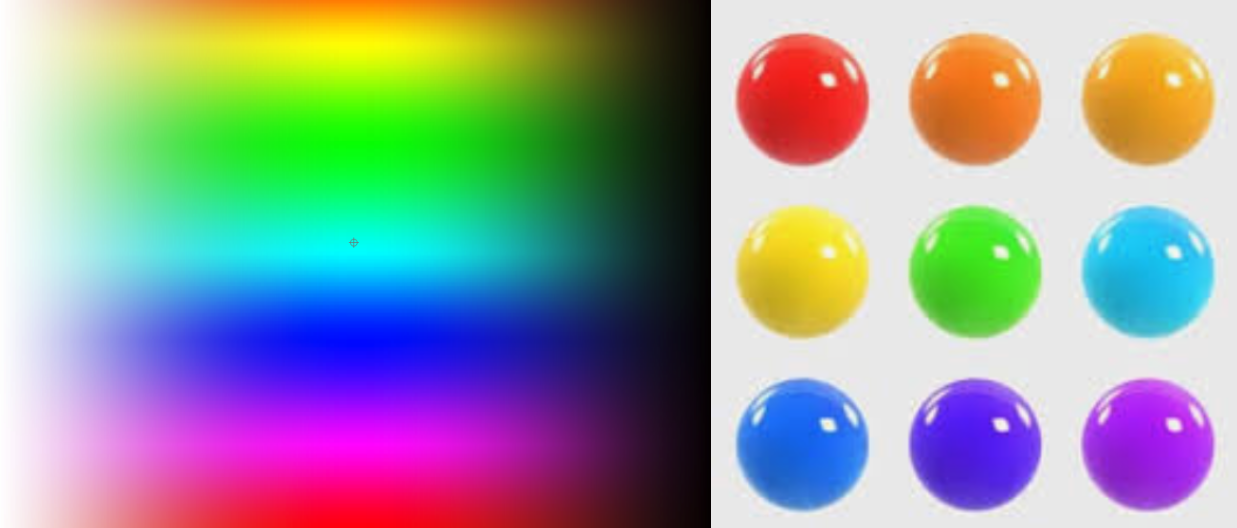
- Color Block Pictures
- 3D model file(.stp)
- K-Flash Software
- Download .NET Framework 4.7.1 for K-Flash
Comparison:
The HUSKYLENS AI Machine Vision Sensor is an efficient and user-friendly tool for computer vision projects. It requires minimal setup and configuration, making it a plug-and-play device that can be used with a variety of platforms, including Arduino, Raspberry Pi, and PCs. The sensor provides a range of functionalities, such as face recognition, object tracking, and line following, which are easily accessible through its intuitive GUI. HUSKYLENS is highly versatile and can be programmed to execute custom algorithms, making it suitable for a variety of projects. It's compact size and low power consumption also make it ideal for small-scale and embedded systems.
The HUSKYLENS AI Machine Vision Sensor and a normal Raspberry Pi camera with OpenCV have some similarities and differences in terms of usage and capabilities. Both devices are capable of capturing images and processing them to extract features or objects of interest. However, there are some key differences between the two:
- Ease of use: The HUSKYLENS AI Machine Vision Sensor is designed for easy integration with microcontrollers such as Arduino and requires minimal coding to get started. On the other hand, using a Raspberry Pi camera with OpenCV requires more advanced programming skills and knowledge of computer vision algorithms.
- Processing power: The Raspberry Pi camera is more powerful than the HUSKYLENS AI Machine Vision Sensor in terms of processing power, which allows for more complex computer vision tasks to be performed. OpenCV is a powerful library that can handle a wide range of computer vision tasks, including image processing, object detection, and tracking.
- AI capabilities: The HUSKYLENS AI Machine Vision Sensor has built-in AI capabilities, which allow it to detect and recognize objects without the need for complex algorithms or programming. This makes it ideal for applications where real-time object detection is required, such as robotics or drones. The Raspberry Pi camera, on the other hand, can be used with machine learning libraries such as TensorFlow or PyTorch to perform more advanced AI tasks.
The HUSKYLENS AI Machine Vision Sensor is a simpler and more convenient option for basic object detection tasks, while the Raspberry Pi camera with OpenCV provides greater flexibility and more advanced capabilities for complex computer vision tasks.