AED 208.95
1
Description
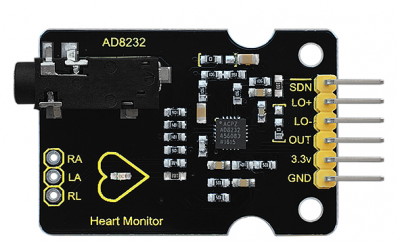
- The Keyestudio Heart Monitor AD8232 ECG Measurement Module with Sensor Pads is a device used for monitoring the electrical activity of the heart. It consists of an AD8232 integrated circuit that serves as the front end for signal conditioning of the cardiac bioelectrical signals, making it suitable for monitoring the heart rate.
- The module is designed to be low-power and can be used with a single lead. It is versatile and can be used for monitoring all types of vital signs. The device comes with sensor pads that are attached to the skin to detect the electrical signals produced by the heart.
- Overall, the Keyestudio Heart Monitor AD8232 ECG Measurement Module with Sensor Pads is a useful device for monitoring the heart rate and other vital signs in a non-invasive manner. It is suitable for use in medical settings, fitness monitoring, and other applications where heart rate monitoring is necessary.

Features:
- AD8232 Integrated Circuit: The device features an AD8232 integrated circuit that serves as the front end for signal conditioning of the cardiac bioelectrical signals, making it suitable for monitoring the heart rate.
- Low Power Consumption: The module is designed to be low-power, making it suitable for use in battery-powered devices.
- Single-lead ECG: The module can be used with a single lead to monitor the heart rate.
- Sensor Pads: The module comes with sensor pads that are attached to the skin to detect the electrical signals produced by the heart.
- Versatile: The device is versatile and can be used for monitoring all types of vital signs, making it useful in a variety of settings.
- Compact Size: The module is small and compact, making it easy to integrate into wearable devices or other compact designs.
- Easy to Use: The module is designed to be easy to use, with clear instructions and guidelines for connecting the sensor pads and obtaining accurate readings.
- Cost-effective: The module is relatively inexpensive compared to other medical monitoring devices, making it accessible to a wide range of users.
Specification:
- Power voltage: DC 3.3 V
- Output: analog output
- Interface(connect RA, LA, RL): 3PIN, 2.54PIN or earphone jack
- Dimension: 36 x 31 x 18mm
- Working Temperature: -40 to +85 Deg C

Applications:
- Medical Monitoring: The module can be used in hospitals and clinics to monitor the heart rate and other vital signs of patients with heart conditions or other health issues.
- Fitness Monitoring: The module can be used in fitness devices, such as smartwatches or fitness trackers, to monitor the heart rate during workouts and exercise routines.
- Wearable Devices: The module can be integrated into wearable devices, such as smart shirts or patches, to monitor the heart rate of the wearer continuously.
- Research: The module can be used in research studies to measure heart rate variability and other parameters related to cardiac health.
- Home Monitoring: The module can be used by individuals at home to monitor their heart rate and track their overall health.
- Education: The module can be used in educational settings, such as universities or medical schools, to teach students about cardiac physiology and electrocardiography.
Pin Connections:
| Pin Name | Description | Connection/Usage |
|---|---|---|
| GND | Power Supply Ground | Ground |
| 3.3v | Power Supply 3.3v | Power Supply (3.3V) |
| OUT (ADC) | Operational Amplifier Output | Connect to ADC input for fully conditioned heart rate signal |
| LO- | Leads Off Comparator Output (−IN electrode disconnected) | DC leads off detection mode: High when −IN disconnected, low when connected |
| LO+ | Leads Off Comparator Output (+IN electrode disconnected) | DC leads off detection mode: High when +IN disconnected, low when connected |
| SDN | Shutdown Control Input | Drive low to enter low power shutdown mode |
| RA (Right Arm) | RED Biomedical electrode pad RA (input) | Instrumentation Amplifier Negative Input (connected to right arm electrode) |
| LA (Left Arm) | YELLOW Biomedical electrode pad LA (input) | Instrumentation Amplifier Positive Input (connected to left arm electrode) |
| RL (Right Leg) | GREEN Biomedical electrode pad RL (input) | Right Leg Drive Output, connect driven electrode (typically right leg) to RLD pin |
Package Includes:
- 1 x Keyestudio Heart Monitor AD8232 ECG Measurement Module With Sensor Pads
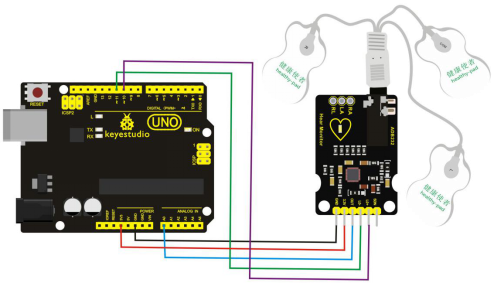
Sample Project:
Circuit:
Library:
- No external library is required for this module to work.
Code:
void setup() {
    // initialize the serial communication:
    Serial.begin(9600);
    pinMode(10, INPUT); // Setup for leads off detection LO +
    pinMode(11, INPUT); // Setup for leads off detection LO -
}

void loop() {

    if((digitalRead(10) == 1)||(digitalRead(11) == 1)) {
        Serial.println('!');
    }
    else {
        // send the value of analog input 0:
        Serial.println(analogRead(A0));
    }
    //Wait for a bit to keep serial data from saturating
    delay(1);
}
Once the code is uploaded, you can see the value on serial monitor and also on the serial plotter.
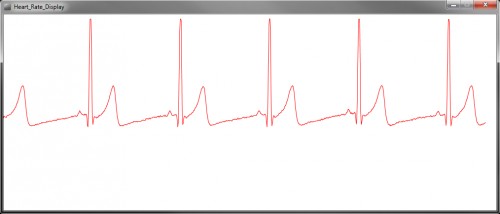
But if you want a separate graph and want to plot it on Processing IDE, you can use the code below and play.
import processing.serial.*;

Serial myPort;        // The serial port
int xPos = 1;         // horizontal position of the graph
float height_old = 0;
float height_new = 0;
float inByte = 0;
int BPM = 0;
int beat_old = 0;
float[] beats = new float[500];  // Used to calculate average BPM
int beatIndex;
float threshold = 620.0;  //Threshold at which BPM calculation occurs
boolean belowThreshold = true;
PFont font;


void setup () {
  // set the window size:
  size(1000, 400);

  // List all the available serial ports
  println(Serial.list());
  // Open whatever port is the one you're using.
  myPort = new Serial(this, Serial.list()[2], 9600);
  // don't generate a serialEvent() unless you get a newline character:
  myPort.bufferUntil('\n');
  // set inital background:
  background(0xff);
  font = createFont("Ariel", 12, true);
}


void draw () {
     //Map and draw the line for new data point
     inByte = map(inByte, 0, 1023, 0, height);
     height_new = height - inByte;
     line(xPos - 1, height_old, xPos, height_new);
     height_old = height_new;

      // at the edge of the screen, go back to the beginning:
      if (xPos >= width) {
        xPos = 0;
        background(0xff);
      }
      else {
        // increment the horizontal position:
        xPos++;
      }

      // draw text for BPM periodically
      if (millis() % 128 == 0){
        fill(0xFF);
        rect(0, 0, 200, 20);
        fill(0x00);
        text("BPM: " + inByte, 15, 10);
      }
}


void serialEvent (Serial myPort)
{
  // get the ASCII string:
  String inString = myPort.readStringUntil('\n');

  if (inString != null)
  {
    // trim off any whitespace:
    inString = trim(inString);

    // If leads off detection is true notify with blue line
    if (inString.equals("!"))
    {
      stroke(0, 0, 0xff); //Set stroke to blue ( R, G, B)
      inByte = 512;  // middle of the ADC range (Flat Line)
    }
    // If the data is good let it through
    else
    {
      stroke(0xff, 0, 0); //Set stroke to red ( R, G, B)
      inByte = float(inString);

      // BPM calculation check
      if (inByte > threshold && belowThreshold == true)
      {
        calculateBPM();
        belowThreshold = false;
      }
      else if(inByte < threshold)
      {
        belowThreshold = true;
      }
    }
  }
}

void calculateBPM ()
{
  int beat_new = millis();    // get the current millisecond
  int diff = beat_new - beat_old;    // find the time between the last two beats
  float currentBPM = 60000 / diff;    // convert to beats per minute
  beats[beatIndex] = currentBPM;  // store to array to convert the average
  float total = 0.0;
  for (int i = 0; i < 500; i++){
    total += beats[i];
  }
  BPM = int(total / 500);
  beat_old = beat_new;
  beatIndex = (beatIndex + 1) % 500;  // cycle through the array instead of using FIFO queue
  }
If the processing sketch does not work, you may need to modify the following line:
myPort = new Serial(this, Serial.list()[2], 9600);
Here 2 is the port number, replace it with 1,3,4,5, or whatever your Arduino Port is.
Notes:
- One important note to keep in mind is that while the Keyestudio Heart Monitor AD8232 ECG Measurement Module with Sensor Pads can be a useful tool for monitoring heart rate and other vital signs, it should not be used as a replacement for professional medical advice and care.
- If you have any concerns about your heart health or other health issues, it is important to consult a qualified healthcare provider. Additionally, it is important to follow the manufacturer's instructions and guidelines for using the device to ensure accurate and safe measurements.
References:
- https://www.keyestudio.com/products/keyestudio-ad8232-ecg-measurement-heart-monitor-sensor-module-for-arduino-uno-r3
- https://www.alibaba.com/product-detail/AD8232-ECG-Measurement-Heart-Monitor-Sensor_60764761865.html
- https://wiki.keyestudio.com/Ks0261_keyestudio_AD8232_ECG_Measurement_Heart_Monitor_Sensor_Module
- https://components101.com/modules/ad8232-ecg-module
- https://how2electronics.com/ecg-monitoring-with-ad8232-ecg-sensor-arduino/