AED 365.40
Description
The Audio Voice Recognition Module V3 is a small electrical module that detects and responds to voice instructions. It comes with seven built-in voice commands. The module operates at 4.5V to 5.5V and can detect the user's voice from up to 2 meters away.
Package Includes:
- 1 x Audio Voice Recognition Module V3
Features:
- Recognizes 7 pre-programmed voice commands
- Can be trained with new voice commands
- On-board microphone for voice input
- Input voltage: 4.5-5.5V DC
- Current consumption: <40mA
- Output format: TTL-level serial port
- Supports baud rates: 9600, 19200, 38400, 57600, 115200
- Can be controlled by any microcontroller with TTL serial port
- Small size: 30mm x 47.5mm
- Comes with header pins for easy connection to a breadboard or PCB.
Description:
The Audio Voice Recognition Module V3 (7 voice commands) is a small electronic module designed to recognize and respond to voice commands. It has seven built-in voice commands. The module operates at a voltage of 4.5V to 5.5V and can detect the user's voice up to a distance of 2 meters. This module is easy to use, with a simple interface that allows users to train the module to recognize their voice. Once trained, the module can be used to control a wide range of devices, such as lights, motors, and other electronic devices, using voice commands. The module has a built-in microphone that picks up the user's voice and a speaker that provides audible feedback. It also features an LED indicator that lights up to signal when a command has been recognized. This module is suitable for use in a wide range of applications, such as home automation, robotics, and voice-controlled devices. It is compact and easy to integrate into projects, making it an ideal choice for hobbyists and DIY enthusiasts.
Principle of Work:
The Audio Voice Recognition Module V3 works by analyzing the sound waves received by a microphone and identifying the spoken words based on a pre-defined set of voice commands. The module uses a voice recognition algorithm to analyze the incoming sound signals and compare them with the pre-stored voice commands in its memory. When it identifies a match, it sends a signal to the microcontroller via a digital interface (UART or GPIO), indicating that a specific voice command has been detected. The module typically allows users to train it with their own voice commands. During the training process, the user speaks the desired command and the module stores its sound wave pattern in its memory. When the user later speaks the trained command, the module can recognize it and trigger the corresponding action.
Pinout:

- VCC: This is the power supply pin, which should be connected to a 5V DC power source.
- GND: This is the ground pin, which should be connected to the ground of the power source.
- TXD: This is the serial transmit pin, which should be connected to the RX pin of the microcontroller or another device that will be receiving data from the module.
- RXD: This is the serial receive pin, which should be connected to the TX pin of the microcontroller or another device that will be sending data to the module.
Applications:
- Home automation: The module can be used to control lights, fans, air conditioners, and other home appliances by simply speaking a command. For example, you can say "Turn on the lights" to activate the light switch.
- Robotics: The module can be used to control the movement of robots or other devices with voice commands. For example, you can say "Move forward" to make a robot move forward.
- Automotive systems: The module can be used to control various systems in a car, such as the audio system or the air conditioning system, by speaking a command.
- Security systems: The module can be used to activate or deactivate security systems, such as door locks or alarms, by voice command.
- Accessibility aids: The module can be used to create devices that can help people with disabilities or limited mobility. For example, it can be used to control a wheelchair or to turn on a TV or radio.
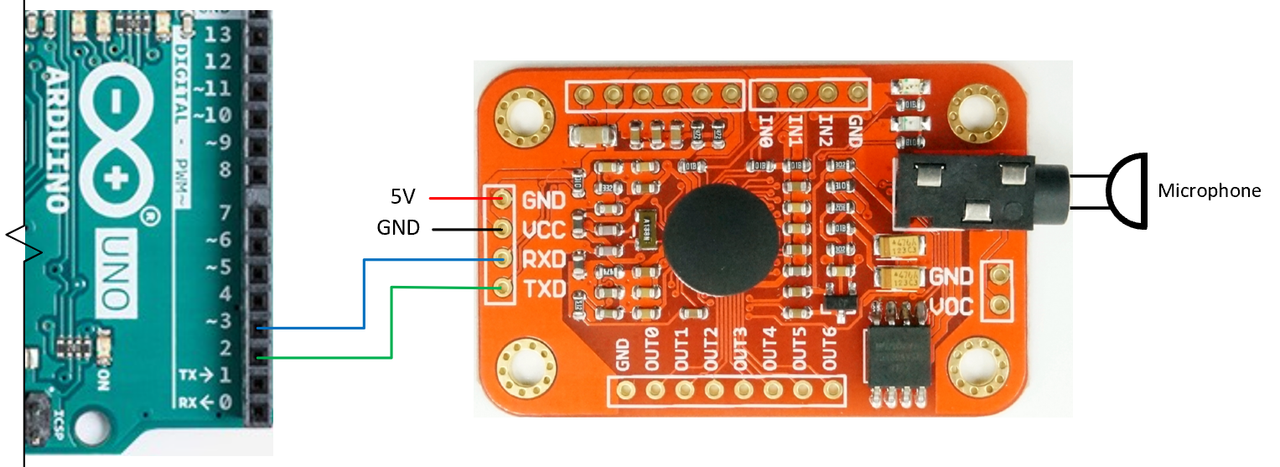
Circuit:
- VCC to Arduino 5V
- GND to Arduino GND
- RXD to Arduino digital pin 3
- TXD to Arduino digital pin 4
Library:
Steps for downloading and installing the "voicerecognitionv3" library:
- Go to the website where the library is hosted.
- Click the "Download" button or clone the repository using Git.
- Extract the downloaded archive to a folder of your choice.
- Open the Arduino IDE.
- In the Arduino IDE, go to "Sketch" > "Include Library" > "Add . ZIP Library".
- Navigate to the folder where you extracted the downloaded library and select the "voicerecognitionv3" folder.
- Click the "Open" button.
-
The library is now installed and ready to use.
Before using the Audio Voice Recognition Module V3 (7 voice commands) Red, you must train the module for voice recognition.
- Connect the circuit to the computer and launch the Arduino IDE.
- Make sure you have selected the correct Arduino board and COM port in the IDE.
- Open the sample program for training the module: go to File -> Examples -> VoiceRecognitionV3 -> vr_sample_train.
- Upload the code to the Arduino and wait until the upload is complete.
- Open the Serial Monitor in the IDE and ensure that the baud rate is set to 115200 and the "Newline" option is selected.
- The Serial Monitor will display a menu for programming the module using various commands.
- The "train" command is used to store a voice command into a specific address, where the module can store up to 80 voice commands.
- To use the "train" command, you should specify the address in the command (e.g., train 0, train 20, train 79).
- To control the LED, you will need to input two voice commands: one for turning it ON and the other for turning it OFF.
- Enter the "train" command followed by the address you want to store the command (e.g., train 20).
- Wait for a message to appear on the Serial Monitor that says "speak now", then speak your command for turning ON the LED into the microphone clearly and loudly.
- Repeat the command to register it if it's clear enough, otherwise, you will be asked to speak it again.
- Repeat the same process to input the voice command for turning OFF the LED, storing it in a different address (e.g., train 30).
- Once you have successfully loaded both of the commands, you can upload the code for controlling the LED.
Code:
To control an LED using your voice, begin by opening the sample program for LED control. To access it, navigate to File, then Examples, then VoiceRecognitionV3, and finally vr_sample_control_led. This program includes two records - "onrecord" for turning the LED on, and "offrecord" for turning it off. You'll need to change the values of "onrecord" and "offrecord" to correspond with the voice commands you've trained to turn the LED on and off. Once you've made these changes, upload the code to the Arduino (Ctrl+U) and you're all set to control your LED using your voice.
#include "oftwareSerial.h"
#include "oiceRecognitionV3.h"

#define VR_RX 2
#define VR_TX 3

// LED connected to pin 13
const int ledPin = 13;

// Create a new instance of the VoiceRecognitionV3 class
VoiceRecognitionV3 vr(VR_RX, VR_TX);

void setup() {
  // Set the LED pin as an output
  pinMode(ledPin, OUTPUT);

  // Start the serial connection
  Serial.begin(9600);

  // Start the voice recognition module
  vr.begin();

  // Add voice commands to the module
  vr.addCommand(0, "onrecord");  // record #0, phrase "onrecord"
  vr.addCommand(1, "offrecord"); // record #1, phrase "offrecord"
}

void loop() {
  // Check if a new command has been received
  int cmd = vr.recognize();

  // Execute the command if one has been received
  if (cmd == 0) {
    digitalWrite(ledPin, HIGH); // Turn the LED on
  } else if (cmd == 1) {
    digitalWrite(ledPin, LOW); // Turn the LED off
  }
}
Note that this code assumes that you have already trained your voice commands and stored them on the voice recognition module. It also assumes that you have connected the LED to pin 13 on the Arduino.
Technical Details:
- Voltage: 4.5-5.5V
- Current: <40mA
- Digital Interface: 5V TTL level for UART interface and GPIO
- Analog Interface: 3.5mm mono-channel microphone connector + microphone pin interface
- Size: 31mm x 50mm
- Recognition accuracy: 99% (under ideal environment)
- Voice Recognition range: 3 meters
- Number of voice commands: 7
- The maximum length of each voice command: 1500ms
- Response time: < 500ms
- Supported languages: English, Chinese
- Non-volatile storage for voice commands, even after power-off
Resources:
Comparisons:
Let's compare the use of this module to the use of Alexa:
The Audio Voice Recognition Module V3 is a hardware device that can recognize up to 7 pre-programmed voice commands, while Alexa is a cloud-based service that can recognize thousands of voice commands and interact with a wide variety of smart devices. The Audio Voice Recognition Module V3 is a simple and cost-effective solution for controlling a small number of devices with your voice. It requires no internet connection, and all the voice recognition is done on the device itself. However, it has some limitations, such as a limited number of voice commands and the need to train the device to recognize each individual command.
Alexa, on the other hand, provides a much more versatile and powerful voice control solution. It can recognize a wide range of voice commands, including natural language requests, and can interact with a large number of devices and services. Alexa also supports many features like scheduling, reminders, music playback, and many more, which are not available in the Audio Voice Recognition Module V3.