AED 32.00
Description
The Multi-Function Shield is a shield for the Arduino microcontroller board that provides various features and functions such as LCD display, push buttons, LEDs, temperature sensors, and more. It is designed to be used for prototyping and experimenting with various projects such as robotics, automation, and data acquisition. The shield is easy to use and can be programmed using the Arduino software. It is a versatile and cost-effective tool for learning and exploring the world of electronics and programming.
Package Includes:
- 1 x Multi-Function Shield for the Arduino
Features:
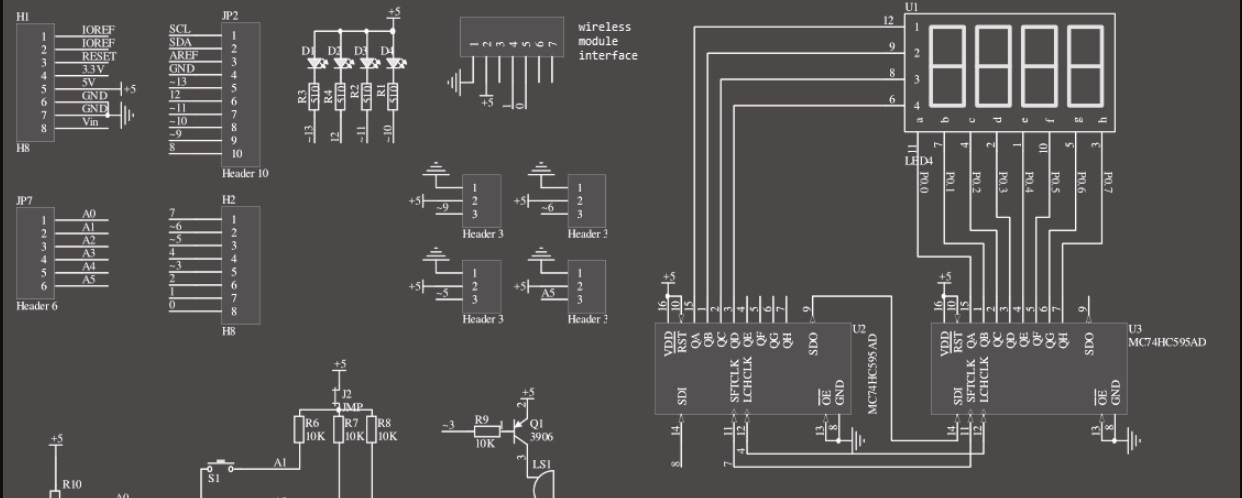
- Four 7-segment displays - The shield includes a 4-digit 7-segment display that can display numbers and some letters. It is connected via 74HC595.
- Three push buttons and a reset button - The shield has three push buttons and a reset button that can be used as input buttons for your projects.
- Potentiometer - There is a potentiometer included on the shield that can be used as an analog input.
- Buzzer - The shield has a piezo buzzer which can be used to generate tones and sounds.
- Connection socket for Dallas DS18B20 - The shield includes a connection socket for the Dallas DS18B20 temperature sensor.
- Connection socket for LM35 - The shield also includes a connection socket for the LM35 temperature sensor.
Description:
The Multi-Function Shield for the Arduino is a versatile expansion board that can be used with the Arduino Uno or Mega. It offers a variety of new functions that can enhance your Arduino projects. The shield includes a 4-digit 7-segment display that can display numbers and some letters. It is connected via 74HC595, a shift register that allows the user to control all four digits with only three Arduino pins. This makes it an efficient way to display numerical data and other information in your projects. The shield also includes three push buttons and a reset button that can be used as input buttons for your projects. These buttons provide a simple way to add user input to your projects, allowing users to control and interact with your creations. A potentiometer is also included on the shield, which can be used as an analog input. This allows you to adjust and control analog signals, such as volume or brightness, in your projects. Additionally, the shield has a piezo buzzer which can be used to generate tones and sounds. This can be useful for adding audio feedback to your projects or creating simple music. The shield includes a connection socket for the Dallas DS18B20 temperature sensor, which can be used to measure ambient temperature in your projects. It also has a connection socket for the LM35 temperature sensor, which is another temperature sensor that can be used for similar purposes.
Principle of Work:
The Multi-Function Shield for the Arduino works by providing a set of pre-built components and connections that can be easily interfaced with the Arduino microcontroller. By plugging the shield onto the Arduino board, the user gains access to a variety of new functions without needing to build and wire up these components themselves. Each of the components on the shield, such as the 7-segment display, push buttons, potentiometer, and temperature sensors, are connected to specific pins on the Arduino board. The Arduino can then control and read data from these components via these pins, using the appropriate libraries and code. For example, to display a number on the 7-segment display, the Arduino can send signals to the shift register (74HC595) on the shield, which in turn controls the display segments. Similarly, the push buttons and potentiometer can be read as digital and analog inputs respectively, allowing the Arduino to respond to user input or adjust the output of the project. By providing these pre-built components and connections, the Multi-Function Shield simplifies the process of building Arduino projects and allows users to focus on the higher-level design and functionality of their projects.
Pinout of the Module:
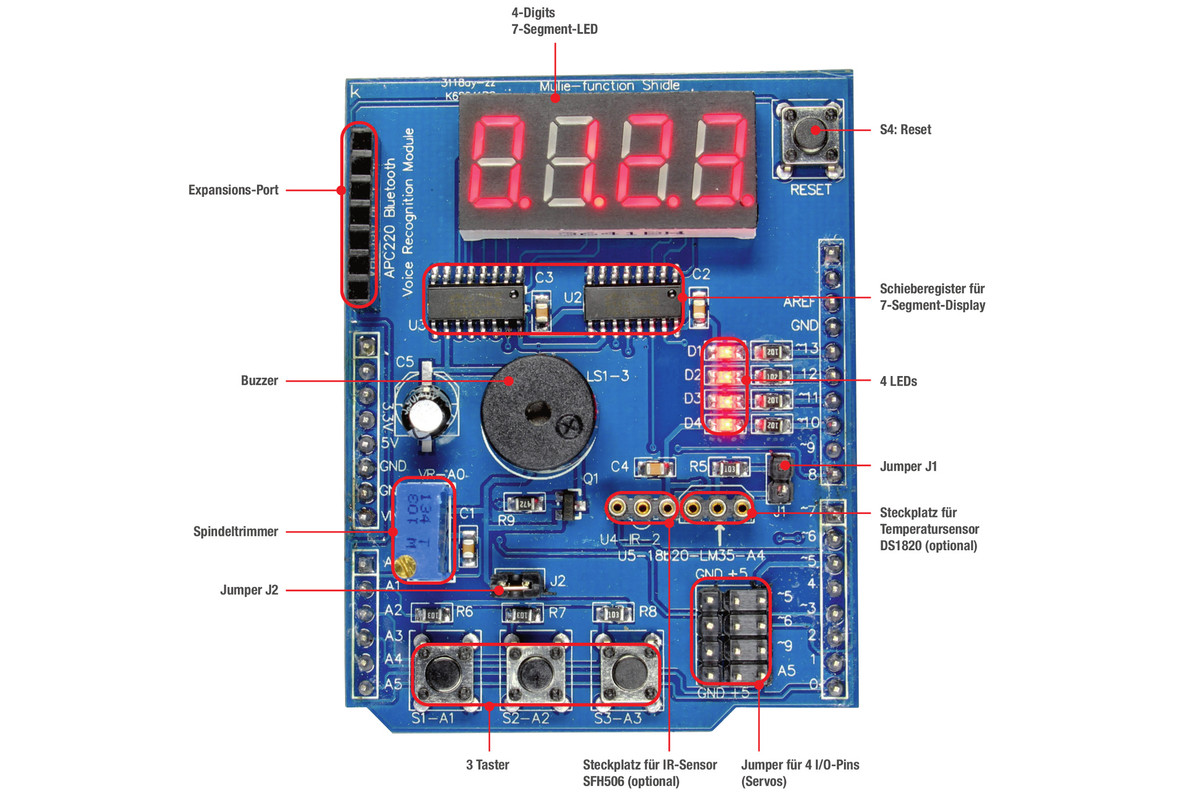
- 4-digit 7-segment LED display module (3641BH) driven by two serial 74HC595’s (Pin Latch 4, Clock 7, Data 8)
- 4 Red LEDs (Pin 10,11,12,13) [D1-13, D2-12, D3-11,D4-10]
- 10K potentiometer (Pin A0) [Vr-A0]
- 3 x push buttons (Pin A1, A2, A3) [S1-A1, S2-A2, S3-A3]
- Piezo buzzer (Pin 3 digital ON/OFF) [LS1-3]
- DS18B20 temperature sensor interface (not included) (Pin A4) [U5-18b20-LM35-A4]
- Bluetooth interface (GND, +5v, 0 = tx, 1 = rx) [APC220]
- Free pins PWM (5, 6, 9, A5) with GND, +5V
- Serial interface header for connection to (optional) serial modules (Bluetooth, wireless interface, voice module, a voice recognition module)
Cautionary Advice
It seemed that most multifunction shields don’t have pins of the seven-segment LED display module trimmed sufficiently. They will likely come into contact with the top of Arduino’s USB connector. A piece of tape over the LED display pins is necessary to clear that issue.
And this is how to connect the temperature sensor:
Applications:
- Temperature monitoring and control: The shield's built-in temperature sensor Pin header (Dallas DS18B20 and LM35) and potentiometer can be used to monitor and adjust temperature levels in a room or system. This could be used in a greenhouse, incubator, or another environmental control system.
- Digital counter or timer: The 7-segment display can be used to display a count or time elapsed, while the push buttons can be used to start, stop, and reset the counter or timer.
- Music or sound effects player: The shield's buzzer can be used to play music or sound effects, while the push buttons can be used to trigger different tracks or effects.
- Game controller: The shield's push buttons and potentiometer can be used to create a simple game controller for a variety of games or interactive projects.
- Display for sensor data: The 7-segment display can be used to display readings from a variety of sensors, such as temperature, humidity, light, or motion sensors.
Circuit:
By just plugging the shield into the Arduino you can easily use it without any connection.
Library:
steps to download the Multi-Function Shield library and add it to the Arduino IDE:
- Click on the link provided to download the MultiFuncShield-Library.zip file.
- Once the file has finished downloading, open the Arduino IDE.
- In the Arduino IDE, go to Sketch > Include Library > Add . ZIP Library...
- Navigate to the location where you downloaded the MultiFuncShield-Library.zip file and select it.
- The library should now be imported into the Arduino IDE and ready to use.
You can now include the library in your Arduino sketch by going to Sketch > Include Library > MultiFuncShield. This will make the library's functions and examples available for use in your project.
Code:
Technical Details:
- Dimensions: 6×4×2.2cm
- Weight: 22
Resources:
- Multi-function Shield Instructions/Datasheet
- Arduino multi-function shield - using Arduino multi-function shield
- Arduino Multi-function Shield
Comparisons:
Using the Multi-Function Shield for the Arduino offers several advantages compared to building individual circuits from scratch. Here are some of the benefits:
- Time-saving: The Multi-Function Shield offers a pre-built set of components and connections that are ready to use, eliminating the need to design and build individual circuits from scratch. This can save significant time in the prototyping and development stages of a project.
- Cost-effective: Buying individual components and building circuits can be more expensive than using a pre-built shield, especially for small projects. The Multi-Function Shield offers a cost-effective solution that provides a range of features in a single package.
- Easy to use: The shield's components are designed to work together seamlessly, and the library provided with the shield makes it easy to control and program the components using the Arduino IDE.
- Versatile: The Multi-Function Shield offers a range of components and connections that can be used in a wide variety of projects. This makes it a versatile tool for hobbyists and professionals alike.
In contrast, building individual circuits from scratch can offer more flexibility and customization options, as well as a deeper understanding of the underlying electronics. However, this requires more time, effort, and expertise, and can be more expensive in terms of both time and money. Ultimately, the choice between using a pre-built shield and building circuits from scratch depends on the specific needs and goals of a project.