AED 32.00
Description
This is a 1.3-inch OLED display module with a 128*64 dot matrix resolution and I2C interface. It is compatible with Arduino and has several advantages over LED displays, including high contrast, wide viewing angle, low power consumption, and a brighter and crisper picture. It uses the SSD1306 OLED driver controller to communicate with microcontrollers and doesn't require any backlight LED. The display operates on 3.3V to 5VDC and has a near 160-degree angle of view. It can be easily connected to an Arduino or 5V logic microcontroller without using any logic-level converter.
Package Includes:
- 1 x 1.3-inch OLED Display Module 128*64 I2C
Features:
- OLED screen with 128*64 dot matrix resolution.
- I2C interface for easy integration with microcontrollers.
- SSD1306 OLED driver controller for communication with microcontrollers.
- Self-emission technology that eliminates the need for a backlight LED.
- High contrast and wide viewing angle of up to 160 degrees.
- Capable of displaying deep black colors.
- Low power consumption of about 20mA on average.
- Compatible with Arduino and other 5V logic microcontrollers.
Description:
The OLED display module with 128*64 dot matrix resolution and I2C interface is a compact and efficient display that offers several advantages over traditional LED displays. It uses an OLED screen with several benefits, such as self-emission, high contrast, wide viewing angle, low power consumption, and a brighter and crisper picture. These benefits make it an excellent choice for applications that require clear and high-quality displays, such as portable devices, wearables, and low-power applications. The module is compatible with Arduino, which makes it easy to use, even for beginners. It comes with the U8glib library for Arduino, which simplifies the process of interfacing with the OLED display. Additionally, the OLED driver controller - SSD1306 - is used to communicate with microcontrollers via I2C communication. This allows for easy integration with a wide range of microcontrollers, including Arduino, Raspberry Pi, and others. The OLED display module doesn't require any backlight LED because it has its own light. This is why it has such high contrast and a wide viewing angle of up to 160 degrees. The OLED display is also capable of displaying deep black colors, which is not possible with LED displays. Moreover, the display's lack of a backlight LED gives it a significant power advantage. On average, the display uses about 20mA current, which is very low compared to LED displays.
Principle of Work:
The OLED display module works by using an OLED (Organic Light-Emitting Diode) screen and an OLED driver controller - SSD1306. The module has a resolution of 128*64 dots and an I2C interface for communication with microcontrollers such as Arduino. The OLED screen is a self-emitting technology that doesn't require any backlight LED. This means that each pixel on the display emits its own light, resulting in a high-contrast display with a wide viewing angle of up to 160 degrees. The OLED screen is also capable of displaying deep black colors, which is not possible with LED displays. The SSD1306 OLED driver controller is used to communicate with microcontrollers via I2C communication. The controller manages the operation of the OLED display by controlling the flow of current to each pixel on the display.
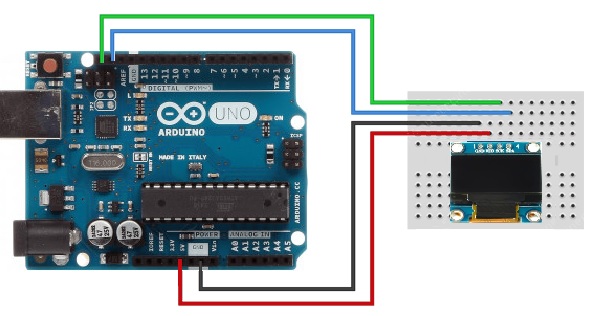
Pinout of the Module:

- VCC: This pin is used to connect the positive power supply to the module. The recommended power supply voltage range is between 3.3V and 5VDC.
- GND: This pin is used to connect the ground of the power supply to the module.
- SCL: This pin is used to connect the SCL (serial clock) line of the microcontroller to the module. SCL is used to synchronize the communication between the microcontroller and the OLED display module.
- SDA: This pin is used to connect the SDA (serial data) line of the microcontroller to the module. SDA is used to transfer data between the microcontroller and the OLED display module.
Applications:
- Wearable devices: The low power consumption and small form factor of the OLED display module make it ideal for wearable devices such as smartwatches, fitness trackers, and health monitoring devices.
- Home automation: The OLED display module can be used in home automation systems to display information such as temperature, humidity, and other sensor readings. It can also be used to control devices and appliances.
- Automotive displays: The high contrast and wide viewing angle of the OLED display module make it an ideal choice for automotive displays such as dashboard displays, infotainment systems, and navigation systems.
- Medical devices: The OLED display module can be used in various medical devices such as blood glucose meters, pulse oximeters, and ECG monitors. The high contrast and deep black color display can improve the accuracy and readability of the information displayed.
- Industrial automation: The OLED display module can be used in various industrial automation applications such as process control systems, manufacturing equipment, and robotic systems. The module's compatibility with microcontrollers and low power consumption make it an idea
Circuit:
Library:
To install the U8glib library on the Arduino IDE, follow these steps:
- Launch the Arduino IDE: Open the Arduino IDE application.
- Access the Library Manager: Go to the Sketch menu, navigate to Include Library, and then select Manage Libraries....
- Search for u8glib: In the Library Manager window, use the search bar at the top right corner. Type "u8glib" and press Enter.
- Find and Install u8glib: Locate the "U8glib" library in the search results. It should be the official library by olikraus. Click on the library to highlight it.
- Install the Library: Click the Install button next to the library name. The Library Manager will download and install the u8glib library for you. This process might take a few moments depending on your internet speed.
- Restart the IDE (Optional): While not always necessary, it's recommended to restart the Arduino IDE after installing a new library. This ensures that the IDE recognizes the newly installed library and updates its internal references.
- The U8glib library will be installed and ready to use in your Arduino projects.
Code:
#include "U8glib.h"    // include the U8glib library

U8GLIB_SSD1306_128X64 u8g(U8G_I2C_OPT_NO_ACK);    // create a U8glib object for SSD1306 128x64 I2C OLED display

void setup() {
  // initialize the I2C interface and display
  u8g.begin();
}

void loop() {
  // clear the display buffer
  u8g.firstPage();
  do {
    // draw text and graphics on the display buffer
    u8g.setFont(u8g_font_6x10);
    u8g.drawStr(0, 20, "Techmaze.ae");
    u8g.drawCircle(64, 32, 20);
  } while(u8g.nextPage());    // send the display buffer to the OLED display
}
#includeincludes the U8glib library, which provides functions to control the display.-
U8GLIB_SSD1306_128X64 u8g(U8G_I2C_OPT_NO_ACK);creates an object of theU8GLIB_SSD1306_128X64class, which is used to communicate with the SSD1306 OLED display module. TheU8G_I2C_OPT_NO_ACKparameter is used to specify the I2C communication mode. - In the
setup()function, theu8g.begin()function is used to initialize the I2C interface and the OLED display. - In the
loop()function, theu8g.firstPage()function is used to clear the display buffer and start drawing on it. Theu8g.setFont()function sets the font size to 6x10, and theu8g.drawStr()function is used to draw the text "Techmaze.ae" at position (0, 20) on the display. Theu8g.drawCircle()function is used to draw a circle with a center at (64, 32) and a radius of 20. - The
do...while()loop is used to send the display buffer to the OLED display using theu8g.nextPage()function.
Technical Details:
- Display type: OLED (Organic Light-Emitting Diode)
- Display size: 1.3 inch
- Resolution: 128x64 pixels
- Viewing angle: 160 degrees
- Communication interface: I2C
- Driver controller: SSD1306
- Supply voltage: 3.3V to 5V DC
- Power consumption: average 20mA
- Operating temperature: -40°C to 85°C
- Dimensions: 35.5mm x 34.0mm x 4.0mm
- Weight: 5g
Resources:
Comparisons:
There are several differences between using an OLED module and a normal graphical LED module:
- Display technology: OLED displays use organic materials that emit light when an electric current is applied, whereas LED displays use a grid of individual light-emitting diodes to create an image.
- Power consumption: OLED displays consume less power compared to LED displays because they do not require a separate backlight to illuminate the pixels. This also means that OLED displays can produce deeper blacks and higher contrast ratios.
- Viewing angle: OLED displays have a wider viewing angle compared to LED displays. This means that the image on an OLED display remains visible from more angles, whereas an LED display may appear washed out or distorted when viewed from certain angles.
- Refresh rate: OLED displays have faster refresh rates compared to LED displays. This means that OLED displays can display fast-moving images without any blurring or ghosting.
- Cost: OLED displays are generally more expensive than LED displays. This is because the manufacturing process for OLED displays is more complex, and the materials used are more expensive.
OLED displays offer several advantages over LED displays, including better contrast, wider viewing angles, lower power consumption, and faster refresh rates. However, they are generally more expensive, which may be a consideration depending on the specific application.