AED 190.00
Description
The Raspberry Pi Zero W is the RPi line's second model of a compact single-board computer. The dimensions and basic technical characteristics of the Zero W were carried over from the previous Pi Zero, but it also received an embedded Bluetooth and Wi-Fi module. This increased its utility. The Pi Zero W is based on a 1GHz Broadcom BCM2835 single-core with 512 MB RAM. Unlike previous Raspberry Pi models, which used a standard HDMI plug, the RPi Zero utilizes a mini HDMI connector to save space. To connect the Zero to a monitor or television, you will need a mini HDMI to HDMI adapter you can get one by clicking here
Features:
- Compact Dimensions: The Raspberry Pi Zero W boasts a compact size with dimensions of 65mm × 30mm × 5mm, making it an excellent choice for projects with limited space.
- Powerful SoC: Driven by the Broadcom BCM2835 System-on-Chip (SoC), providing efficient and reliable processing capabilities for a variety of applications.
- High-Performance CPU: ARM11 CPU clocked at 1GHz ensures smooth and responsive operation.
- Ample RAM: Equipped with 512MB of RAM, supporting multitasking and handling diverse computational tasks.
- Wireless Connectivity: Features 2.4GHz 802.11n wireless LAN for seamless wireless communication.
- Bluetooth Support: Incorporates Bluetooth Classic 4.1 and Bluetooth Low Energy (LE) for versatile connectivity options.
- Power Input: Powered by a 5V supply via the micro USB connector, providing a common and convenient power source.
- Video & Audio Output: Supports 1080P HD video and stereo audio output through the mini-HDMI connector, ensuring high-quality multimedia capabilities.
- Storage Options: Utilizes a MicroSD card for storage, offering flexibility and expandability.
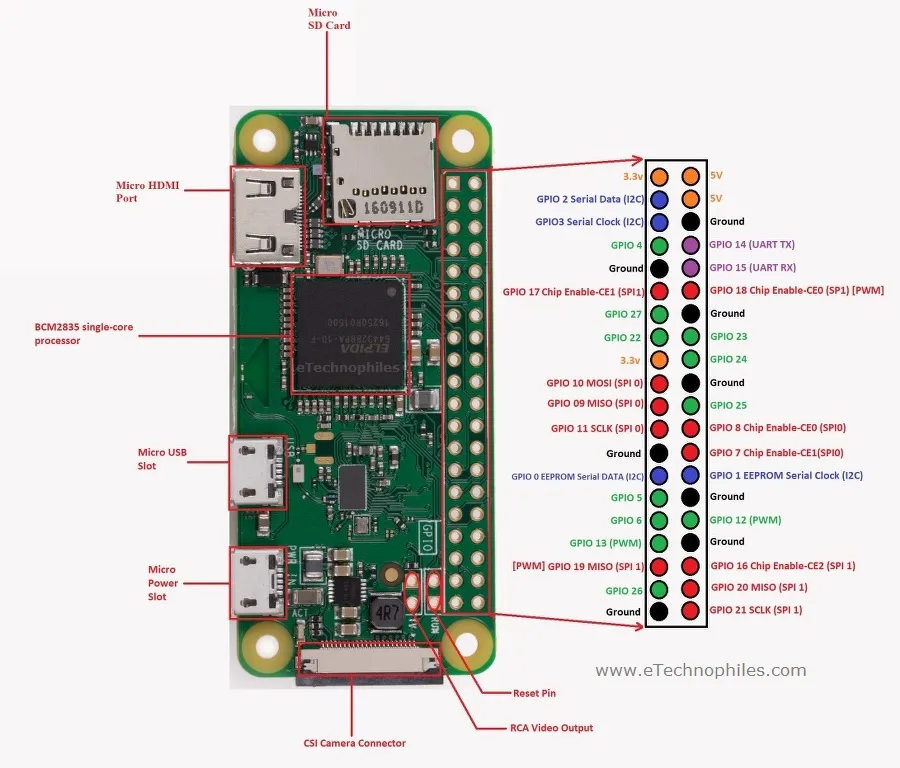
- GPIO Pins: Equipped with a 40-pin GPIO (General Purpose Input/Output) layout, providing interfaces for various external devices and sensors.
- Camera Serial Interface (CSI): Includes a CSI for connecting a camera module, expanding the range of potential applications.
Specifications:
- SoC: Broadcom BCM2835
- CPU: ARM11 running at 1GHz
- RAM: 512MB
- Wireless: 2.4GHz 802.11n wireless LAN
- Bluetooth: Bluetooth Classic 4.1 and Bluetooth LE
- Power: 5V, supplied via micro USB connector
- Video & Audio: 1080P HD video & stereo audio via mini-HDMI connector
- Storage: MicroSD card
- Output: Micro USB
- GPIO: 40-pin GPIO, unpopulated
- Pins: Run mode, unpopulated; RCA composite, unpopulated
- Camera Serial Interface (CSI): Available
There are some items needed to start with RPi you can click on the name of the item to go to the buying page:
| HDMI Cable |
| an SDcard |
| a USB Mouse & Keyboard |
| monitor if you don't have (any HDMI one works) |
| Power source |
| optional case for protecting the board |
Getting Started with Raspberry Pi Zero W:
When diving into the world of Raspberry Pi Zero W, it's essential to understand its unique features and setup process. In comparison to its predecessors like the RPi 3, which typically featured 2-4 standard-size female USB ports, the Zero W introduces a streamlined design with a USB On-the-Go (OTG) connection. This innovation not only reduces space but also enhances the overall efficiency of the device.
The heart of the Raspberry Pi Zero W lies in the Broadcom BCM2835 System-on-Chip (SoC), the same powerful IC found in earlier Raspberry Pi A and A+ variants. This IC is directly linked to the HDMI port on your monitor or television, providing a direct and seamless connection for video output.
Step-by-Step Setup:
- USB On-the-Go (OTG) Connection: Use the micro USB connector to attach the USB OTG cable to the Raspberry Pi Zero W. This unique connection method supports a variety of devices such as mice, keyboards, and WiFi dongles.
- Keyboard/Mouse Combo or USB Hub: If you have a keyboard/mouse combo, connect your dongle to the regular female USB end of the OTG cable. For separate devices, consider using a USB hub to facilitate connections. This ensures flexibility in managing multiple peripherals.
- MicroSD Card Setup: Ensure your microSD card contains a valid Raspberry Pi image for the operating system. Insert the microSD card into the designated microSD slot on the Raspberry Pi Zero W.
- Powering Up: Use the micro USB power input to provide the necessary power to your Raspberry Pi Zero W. This straightforward step activates the device and prepares it for use in your projects.
Pinout of the Board: