AED 30.45
Description
The NodeMcu is an open-source firmware and development board designed for prototyping Internet of Things (IoT) devices. It is based on the WLAN ESP-12E and utilizes the CP2102 USB chipset. The board provides complete integration with the Arduino IDE, making it easy to get started with IoT projects.
Package Includes:
- 1 x NodeMcu Lua V2 CP2102
Features:
- Open-source: The NodeMcu module is built on open-source principles, allowing users to access and modify the firmware and hardware as needed.
- Interactive Programmable: It provides a simple and low-cost solution for creating smart devices with Wi-Fi connectivity.
- Arduino IDE Compatibility: The module seamlessly integrates with the Arduino IDE, enabling users to write and upload code using familiar Arduino programming methods.
- Advanced API: The module offers an advanced API for hardware input/output (IO), which reduces the effort required for configuring and manipulating hardware components.
- Node.js-style Network API (Lua Programming): When using Lua programming language, the NodeMcu module supports an event-driven API for network applications, allowing developers to write code in a Node. js-style.
- Wi-Fi Connectivity: The module is equipped with a powerful ESP8266 microcontroller (ESP-12E) with integrated 802.11 b/g/n WLAN. This enables easy integration with Wi-Fi networks for IoT applications.
- GPIO Pins: The module provides 13 digital input/output (GPIO) pins, allowing for the connection and control of various sensors, actuators, and other electronic components.
- Analog Input: It has 1 analog input pin (ADC) for reading analog sensor values.
- PWM Support: The NodeMcu module supports Pulse Width Modulation (PWM) on every GPIO pin, allowing for control of devices that require variable power levels.
- I2C and 1-Wire Support: It has built-in support for the I2C communication protocol, making it compatible with a wide range of sensors and devices.
- Flash Memory: The module comes with 4MB of flash memory, providing ample storage space for program code and data.
- Compact Size: The module has a small form factor
Description:
The NodeMCU Lua 2 module is powered by the ESP8266 microcontroller, specifically the ESP-12E variant. This highly integrated chip combines a 32-bit processor with Wi-Fi connectivity, making it an ideal choice for IoT applications. With integrated 802.11 b/g/n Wi-Fi connectivity, the module enables seamless integration with Wi-Fi networks. This allows IoT devices to connect to the internet and communicate wirelessly with other devices and services. The module provides a range of general-purpose input/output (GPIO) pins, including D0, D1, D2, D3, D4, D5, D6, D7, and D8. These pins can be used for digital input or output, facilitating communication with various sensors, actuators, and electronic components. For analog sensor readings, the NodeMCU Lua 2 module offers an analog input pin labeled A0. This pin allows for the measurement of analog values such as temperature or light intensity using the onboard analog-to-digital converter (ADC). Serial communication is supported through TXD and RXD pins, enabling data exchange with other devices or modules using the UART protocol. The module operates at a voltage of 3.3V and can be powered either through the USB port (with 5V input) or an external power supply connected to the VCC pin. Developers can program the NodeMCU Lua 2 module using the Lua scripting language, which provides a lightweight and user-friendly environment. Alternatively, the module is also compatible with the Arduino Integrated Development Environment (IDE), offering a familiar and robust platform for IoT application development.
Principle of Work:
The NodeMCU Lua 2 module operates internally by utilizing the capabilities of the ESP8266 microcontroller. The microcontroller contains a powerful processor, flash memory for storing the program code, RAM for data storage, and integrated Wi-Fi functionality. The module can be programmed using either the Lua scripting language or the Arduino IDE. Lua provides a lightweight and straightforward scripting environment, allowing you to write code directly on the module. Lua scripts can be uploaded to the module and executed to perform various tasks, such as reading sensor data, controlling outputs, and interacting with Wi-Fi networks. The NodeMCU Lua 2 module is also compatible with the Arduino IDE, which is a popular development environment for programming microcontrollers. With the Arduino IDE, you can write code in the Arduino programming language (based on C/C++) and upload it to the module. This compatibility extends the capabilities of the module by providing access to a vast ecosystem of Arduino libraries and resources, simplifying the development process for many projects. Regarding the Wi-Fi functionality, the NodeMCU Lua 2 module is equipped with the ESP8266's built-in Wi-Fi capabilities. This allows the module to connect to Wi-Fi networks and communicate with other devices over the internet or local network. The module supports common Wi-Fi protocols, such as 802.11 b/g/n, providing reliable wireless connectivity. The Wi-Fi functionality inside the module enables a wide range of IoT projects. You can create projects that involve remote monitoring and control, data transmission to cloud platforms, integration with online services, and more. The module can act as a Wi-Fi client, connecting to existing networks, or as an access point, allowing other devices to connect to it.
Pinout of the Module:
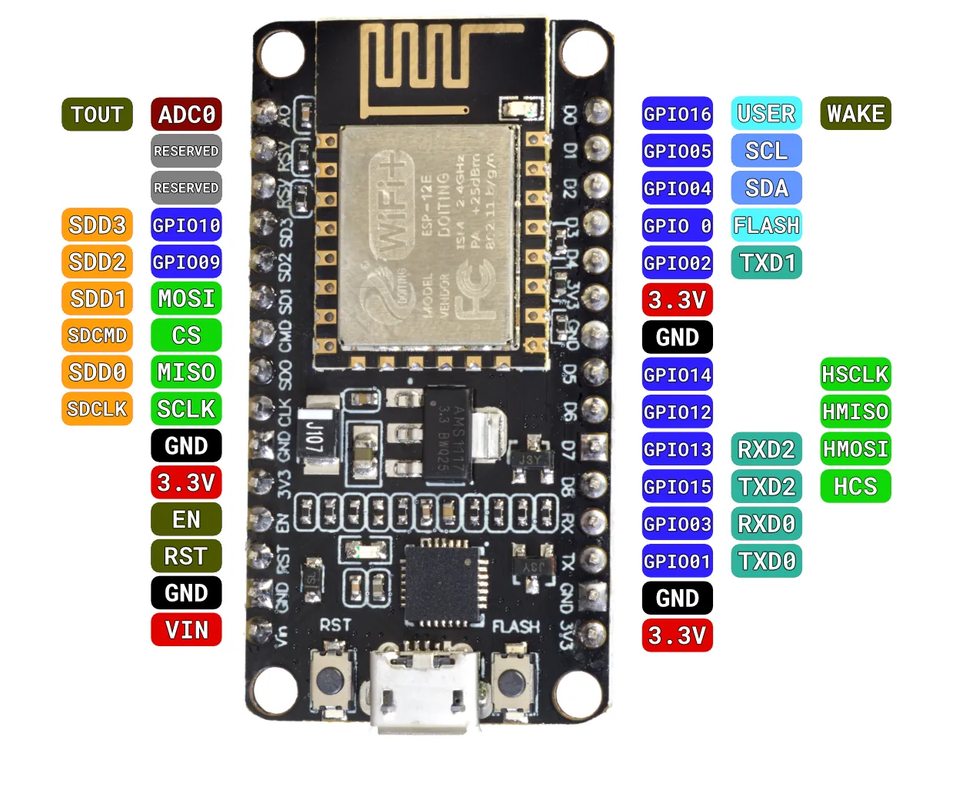
| Pin | Function |
|---|---|
| VCC | Power Supply (3.3V) |
| GND | Ground |
| TXD | Transmit Data (Serial) |
| RXD | Receive Data (Serial) |
| D0 | Digital I/O (GPIO16) |
| D1 | Digital I/O (GPIO5) |
| D2 | Digital I/O (GPIO4) |
| D3 | Digital I/O (GPIO0) |
| D4 | Digital I/O (GPIO2) |
| D5 | Digital I/O (GPIO14) |
| D6 | Digital I/O (GPIO12) |
| D7 | Digital I/O (GPIO13) |
| D8 | Digital I/O (GPIO15) |
| A0 | Analog Input (ADC0) |
Applications:
- Home Automation: The module can be used to create smart home systems, allowing users to control and monitor devices such as lights, appliances, thermostats, and security systems remotely through a smartphone or web interface.
- Environmental Monitoring: With the NodeMCU Lua 2 module, you can develop projects for monitoring environmental conditions like temperature, humidity, air quality, and noise levels. This data can be collected and analyzed for various applications, such as optimizing energy usage or ensuring optimal conditions in a greenhouse.
- IoT Sensor Networks: The module is ideal for creating sensor networks where multiple sensor nodes gather data and transmit it to a central hub or cloud platform. These networks can be used for applications like smart agriculture, smart cities, industrial monitoring, and asset tracking.
- Smart Energy Management: The module can be integrated with energy monitoring devices to track and manage energy consumption in buildings. It enables real-time monitoring, remote control of electrical devices, and data analytics for optimizing energy usage and reducing costs.
- Wearable Devices: With its compact size and low power consumption, the module can be used in wearable devices such as fitness trackers, smartwatches, and health monitoring devices. It enables data collection, connectivity, and synchronization with other devices or cloud services.
- IoT Prototyping and Education: The NodeMCU Lua 2 module is widely used for educational purposes and prototyping IoT projects. Its ease of use, compatibility with the Arduino IDE, and access to a vast library of resources make it an excellent choice for beginners and experienced developers alike.
- Remote Monitoring and Control: The module can be used for remote monitoring and control applications, such as remote surveillance, home security systems, and industrial automation. It allows users to monitor and control devices or receive alerts and notifications remotely through the internet.
Circuit:
No circuit is needed we are going to blink the onboard LED.
Library:
To install and set up the NodeMCU Lua 2 module on the Arduino IDE, follow these steps:
- Install Arduino IDE: Download and install the latest version of the Arduino IDE from the official Arduino website (https://www.arduino.cc/en/software). Choose the appropriate version for your operating system.
- Open Arduino IDE: Launch the Arduino IDE after the installation is complete.
- Add ESP8266 Board Manager URL: Open the "File" menu and select "Preferences." In the "Additional Boards Manager URLs" field, add the following URL: http://arduino.esp8266.com/stable/package_esp8266com_index.json If there are other URLs already present, separate them with a comma. Click "OK" to save the preferences.
- Install ESP8266 Board Package: Open the "Tools" menu, select "Board," then "Boards Manager." In the Boards Manager window, type "esp8266" in the search box. Look for "esp8266 by ESP8266 Community" and click the "Install" button. This will install the necessary board package for the ESP8266 microcontroller.
- Select NodeMCU Board: After the installation, open the "Tools" menu again, select "Board," and scroll down to find "NodeMCU 1.0 (ESP-12E Module)." Select this board option. Make sure the other settings such as the CPU Frequency and Flash Size are set to their default values.
- Choose the Port: Connect your NodeMCU Lua 2 module to your computer using a USB cable. In the "Tools" menu, select the appropriate port under the "Port" option. The connected port should be named something like "COMX" (Windows) or "/dev/cu.XXXX" (Mac).
Code:
Upload Test Sketch: To test the setup, open the example sketch named "Blink" by going to "File" > "Examples" > "01.Basics
or copy this code:
void setup() {
  pinMode(LED_BUILTIN, OUTPUT); // Set the onboard LED pin as an output
}

void loop() {
  digitalWrite(LED_BUILTIN, HIGH); // Turn on the LED
  delay(1000); // Wait for 1 second

  digitalWrite(LED_BUILTIN, LOW); // Turn off the LED
  delay(1000); // Wait for 1 second
}
The onboard LED should start blinking with a 1-second interval.
Explanation:
- The
setup()function is called once when the microcontroller starts. We use it to configure the pin connected to the onboard LED (LED_BUILTIN) as an output pin usingpinMode(). - The
loop()function runs repeatedly after thesetup()function. Inside the loop, we turn on the LED by setting the pin toHIGHusingdigitalWrite(), then we wait for 1 second usingdelay(). - After that, we turn off the LED by setting the pin to
LOW, and wait for another 1 second before the loop repeats.
Technical Details:
- Operating voltage: 3.3V
- Input voltage: (USB) 5V
- Powerful ESP8266 microcontroller (ESP-12E) with 802.11 b/g/n WLAN and integrated 25dBm antenna
- Digital I/O pins (GPIO): 13
- Analog input pins (ADC): 1
- every GPIO can PWM
- I2C, 1-wire PCB antenna
- flash memory: 4MB
- clock speed: 80MHz/160MHz
- CPU: 32-bit
- USB driver chip: CP2102
- Dimensions (LxWxH): 48 x 26 x 13 mm
Resources:
Comparisons:
The NodeMCU Lua 2 module and the ESP-01 module are both popular choices for IoT projects, but they have some differences in terms of features and ease of use. Here's a comparison between the two:
- Functionality: The NodeMCU Lua 2 module is a development board that integrates the ESP8266 microcontroller with built-in Wi-Fi capabilities. It provides a more comprehensive set of features, including more GPIO pins, analog input, and support for programming in both Lua and Arduino IDE. On the other hand, the ESP-01 module is a compact Wi-Fi module that requires additional circuitry and components to function as a standalone microcontroller. It has limited GPIO pins and lacks analog input.
- Ease of Use: The NodeMCU Lua 2 module is generally considered easier to use compared to the ESP-01 module. It comes with pre-flashed firmware, a USB port for easy programming, and provides compatibility with the Arduino IDE. The NodeMCU Lua 2 module also has a larger community and extensive documentation, making it more beginner-friendly. The ESP-01 module requires additional programming and wiring efforts, and it may have a steeper learning curve for beginners.
- Pin Configuration: The NodeMCU Lua 2 module provides a more convenient pin configuration with headers and labeling, allowing for easier connection of external components. It has more GPIO pins and additional features such as analog input. The ESP-01 module, being a compact module, has limited GPIO pins and requires additional wiring and components for expansion.
- Size and Form Factor: The NodeMCU Lua 2 module has a larger form factor compared to the compact ESP-01 module. The NodeMCU Lua 2 module's larger size allows for easy prototyping and connection of external components. The ESP-01 module's small size is advantageous for space-constrained projects where compactness is a priority.