Out Of Stock
Description
The Raspberry Pi Zero 2 W is a tiny yet powerful development board designed for makers, hobbyists, and professionals alike. It features a quad-core ARM Cortex-A53 processor, 512MB of LPDDR4 RAM, dual-band 2.4GHz/5GHz WiFi, Bluetooth 5.0, and a range of GPIO pins for connecting various components and sensors.
Package Includes:
- 1 x Raspberry Pi Zero 2 W
Features:
- Processor: The Raspberry Pi Zero 2 W is powered by a 1GHz quad-core ARM Cortex-A53 CPU, which is more powerful than the previous Raspberry Pi Zero models.
- Memory: It has 512MB of RAM, which is sufficient for most basic computing tasks.
- Wireless connectivity: The Raspberry Pi Zero 2 W comes with built-in Wi-Fi (2.4GHz and 5GHz) and Bluetooth 5.0, which makes it easier to connect to the internet and other devices.
- Ports: It has a micro-SD card slot for storage, a mini-HDMI port for connecting to a display, and a USB 2.0 port for connecting peripherals.
- Size: The Raspberry Pi Zero 2 W is incredibly small, measuring only 66mm x 30mm x 5mm, which makes it perfect for projects where space is limited.
- Power consumption: The Raspberry Pi Zero 2 W consumes very little power, making it ideal for battery-powered projects. It has a maximum power consumption of 3.5 watts.
- Operating system: The Raspberry Pi Zero 2 W can run a variety of operating systems, including Raspberry Pi OS, Ubuntu, and many others.
- GPIO pins: It has 40 GPIO pins, which makes it compatible with a wide range of add-on boards and sensors.
Description:
The Raspberry Pi Zero 2 W is a tiny and powerful single-board computer that is designed for makers, hobbyists, and enthusiasts. It is the latest addition to the Raspberry Pi Zero family and features a more powerful processor, increased memory, and wireless connectivity, making it easier to connect to the internet and other devices. The board is powered by a 1GHz quad-core ARM Cortex-A53 CPU, which is more powerful than its predecessor, the Raspberry Pi Zero. It has 512MB of RAM, which is sufficient for most basic computing tasks. The Raspberry Pi Zero 2 W also comes with built-in Wi-Fi (2.4GHz and 5GHz) and Bluetooth 5.0, making it easier to connect to the internet and other devices. The Raspberry Pi Zero 2 W has a micro-SD card slot for storage, a mini-HDMI port for connecting to a display, and a USB 2.0 port for connecting peripherals. It also has 40 GPIO pins, which makes it compatible with a wide range of add-on boards and sensors. It has a dedicated camera interface and a composite video port, making it easy to connect a camera or display.
Principle of Work:
- The working principle of the Raspberry Pi Zero 2 W module is based on the concept of a single-board computer. It contains all the necessary components required to function as a computer on a single board. The central processing unit (CPU) on the board is a quad-core ARM Cortex-A53 CPU, which is responsible for executing instructions and processing data. The board also has 512MB of RAM, which is used to store data temporarily and assist in processing. The Raspberry Pi Zero 2 W module comes with built-in wireless connectivity, including Wi-Fi and Bluetooth, allowing it to connect to the internet and other devices wirelessly. It also has a micro-SD card slot for storage, a mini-HDMI port for connecting to a display, and a USB 2.0 port for connecting peripherals.
- The 40 GPIO pins on the board enable it to communicate with other devices and sensors, making it versatile and flexible for a wide range of projects.
- To use the Raspberry Pi Zero 2 W module, you need to connect it to a power source, such as a USB power adapter, and then connect a display, keyboard, and mouse. You can then install an operating system, such as Raspberry Pi OS, and start using it like a traditional computer.
Pinout of the Module:

| Pin Name | Description | Pin Name | Description |
|---|---|---|---|
| 3V3 | Power pin for 3.3V devices and sensors | 5V | Power pin for 5V devices and sensors |
| GPIO 2 | General Purpose Input/Output pin 2 | GPIO 17 | General Purpose Input/Output pin 17 |
| GPIO 3 | General Purpose Input/Output pin 3 | GPIO 27 | General Purpose Input/Output pin 27 |
| GND | Ground pin for 0V devices and sensors | GPIO 22 | General Purpose Input/Output pin 22 |
| GPIO 4 | General Purpose Input/Output pin 4 | GPIO 10 | General Purpose Input/Output pin 10 |
| GPIO 9 | General Purpose Input/Output pin 9 | GPIO 11 | General Purpose Input/Output pin 11 |
| GPIO 0 | General Purpose Input/Output pin 0 | GPIO 5 | General Purpose Input/Output pin 5 |
| GPIO 6 | General Purpose Input/Output pin 6 | GPIO 13 | General Purpose Input/Output pin 13 |
| GPIO 19 | General Purpose Input/Output pin 19 | GPIO 26 | General Purpose Input/Output pin 26 |
| GPIO 14 | General Purpose Input/Output pin 14 | GND | Ground pin for 0V devices and sensors |
| GPIO 15 | General Purpose Input/Output pin 15 | GPIO 18 | General Purpose Input/Output pin 18 |
| GPIO 23 | General Purpose Input/Output pin 23 | GPIO 24 | General Purpose Input/Output pin 24 |
| GND | Ground pin for 0V devices and sensors | GPIO 25 | General Purpose Input/Output pin 25 |
| GPIO 8 | General Purpose Input/Output pin 8 | GPIO 7 | General Purpose Input/Output pin 7 |
| ID_SD | Identification EEPROM for HATs | ID_SC | Identification EEPROM for HATs |
| GND | Ground pin for 0V devices and sensors | GPIO 12 | General Purpose Input/Output pin 12 |
| GPIO 16 | General Purpose Input/Output pin 16 | GPIO 20 | General Purpose Input/Output pin 20 |
| GPIO 21 | General Purpose Input/Output pin 21 |
Applications:
- DIY projects: The board is great for building DIY projects such as home automation, smart mirrors, and media centers.
- Robotics: The board can be used to power robots and drones, as it is small and lightweight.
- Internet of Things (IoT): The board is ideal for building IoT devices and sensors, as it can connect to the internet wirelessly.
- Education: The board is a great tool for teaching programming and electronics to students, as it is affordable and easy to use.
- Home security: The board can be used to build home security systems such as cameras and doorbells.
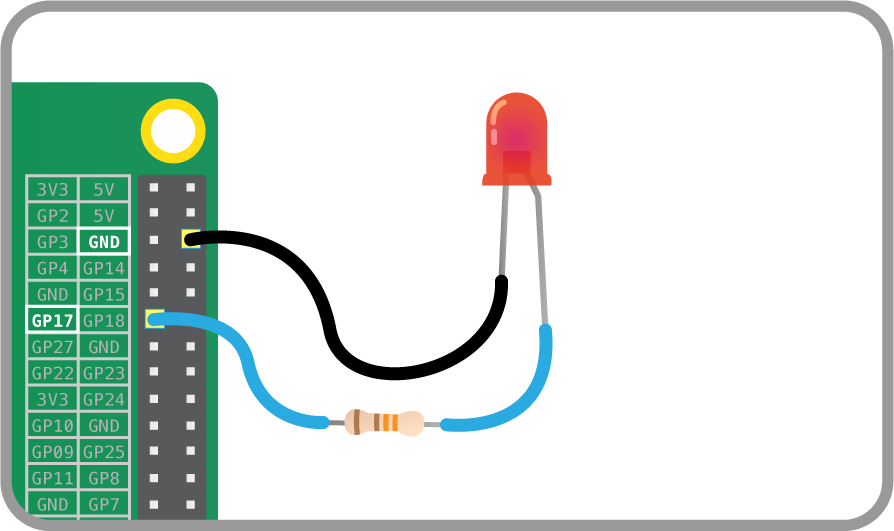
Circuit:
Connect an Led to the RPi by wiring the long leg to the GP17 on RPi Through a 330ohm resistor and the negative short leg to the GND.
Library:
To start with RPi zero 2 W follow these steps:
- Get a microSD card: The board requires a microSD card to store the operating system and other data.
- Download and install an operating system: You can download and install the official Raspberry Pi OS or any other compatible operating system on the microSD card:
- Download the Raspberry Pi Imager: You can download the Raspberry Pi Imager software from the official Raspberry Pi website (https://www.raspberrypi.org/software/). Install the software on your computer.
- Insert the microSD card: Insert the microSD card into the SD card reader of your computer.
- Open the Raspberry Pi Imager: Open the Raspberry Pi Imager software on your computer.
- Select the Raspberry Pi OS: In the Raspberry Pi Imager software, select the Raspberry Pi OS from the list of available operating systems.
- Select the microSD card: In the Raspberry Pi Imager software, select the microSD card that you inserted in step 2.
- Write the image: Click on the "Write" button in the Raspberry Pi Imager software to write the Raspberry Pi OS image to the microSD card.
- Wait for the process to complete: The process of writing the image to the microSD card may take a few minutes. Wait for the process to complete.
- Eject the microSD card: Once the process is complete, eject the microSD card from your computer.
- Insert the microSD card into the Raspberry Pi Zero 2 W: Insert the microSD card into the microSD card slot on the Raspberry Pi Zero 2 W.
- Power on the board: Connect a micro USB cable to the board's power input and connect it to a power source, such as a USB power adapter or a power bank.
- Start using the board: Once the board is powered on, you should see the Raspberry Pi OS booting up on the connected monitor.
- Power up the board: Connect a micro USB cable to the board's power input and connect it to a power source, such as a USB power adapter or a power bank.
- Connect peripherals: You can connect a keyboard, mouse, and monitor to the board using a USB hub or adapter. Alternatively, you can use SSH to access the board remotely.
- Connect the Raspberry Pi Zero 2 W to the network: Connect the board to a network via Wi-Fi or Ethernet cable.
- Find the IP address of the board: You can find the IP address of the board by using a tool such as Fing or by checking your router's connected devices list.
- Enable SSH on the Raspberry Pi: Open the Raspberry Pi Configuration tool by typing
sudo raspi-configin the terminal. Navigate to "Interfacing Options" and select "SSH". Choose "Yes" to enable SSH. - Connect to the Raspberry Pi via SSH: Open a terminal on your computer and type the following command:
ssh pi@. Replaceraspberry. - Start using the Raspberry Pi remotely: Once you are connected to the Raspberry Pi via SSH, you can start using it remotely. You can run commands, transfer files, and even run graphical applications over SSH using X11 forwarding.
- Note: For security reasons, it is recommended that you change the default password of the Raspberry Pi and enable key-based authentication for SSH access.
- Start using the board: Once the board is powered on and peripherals are connected, you can start using it. You can run commands in the terminal, use a GUI interface, or develop and run programs.
Code:
To use Python on the Raspberry Pi Zero 2 W, you can use the pre-installed Python IDE called Thonny or install other IDEs such as IDLE or PyCharm.
this is a Python code to link an LED connected to pin 17:
- Connect an LED to pin 17 of the Raspberry Pi Zero 2 W. Connect the positive leg (longer leg) of the LED to pin 17 and the negative leg (shorter leg) to a ground pin (e.g., pin 9, 14, 20, or 25).
- Open the Thonny Python IDE: Click on the "Menu" button on the Raspberry Pi desktop, select "Programming", and then click on "Thonny Python IDE".
- Write the Python code: In the Thonny Python IDE, create a new file and enter the following code:
import RPi.GPIO as GPIO
import time

# Set up the GPIO pin
LED_PIN = 17
GPIO.setmode(GPIO.BCM)
GPIO.setup(LED_PIN, GPIO.OUT)

# Blink the LED
while True:
    GPIO.output(LED_PIN, GPIO.HIGH)
    time.sleep(1)
    GPIO.output(LED_PIN, GPIO.LOW)
    time.sleep(1)
- Run the Python code: Click on the "Run" button or press F5 to run the Python code.
- The LED connected to pin 17 should start blinking at a 1-second interval. To stop the code, click the "Stop" button or press F4.
Technical Details:
- CPU: Broadcom BCM2710C0 quad-core Cortex-A53 (ARMv8) 64-bit SoC @ 1GHz
- RAM: 512MB LPDDR2 SDRAM
- Wireless connectivity: 2.4 GHz and 5 GHz IEEE 802.11b/g/n/ac wireless LAN and Bluetooth 5.2 BLE
- Ethernet: Gigabit Ethernet (maximum throughput 300 Mbps) over USB 2.0
- USB: 2 × USB 2.0 ports (up to 480 Mbps)
- Video and audio: Mini HDMI port for 1080p60 video output and 2.5mm jack for audio output
- Camera interface: MIPI CSI-2 connector for Raspberry Pi camera
- Display interface: MIPI DSI connector for Raspberry Pi touchscreen display
- Storage: microSD card slot for loading operating system and data storage
- GPIO: 40-pin GPIO header, compatible with Raspberry Pi HATs
- Power: 5V DC via USB-C connector (minimum 3A) or GPIO header (minimum 1.5A)
- Dimensions: 66mm × 30.5mm × 5.0mm
Resources:
Comparisons:
The Raspberry Pi Zero 2 W and the Raspberry Pi Zero W are both tiny and affordable single-board computers designed for makers, hobbyists, and students who want to learn to program and build their own projects. However, the Raspberry Pi Zero 2 W is an updated version of the original Raspberry Pi Zero W with some significant improvements. Here are some key differences between the two:
- Processor: The Raspberry Pi Zero 2 W is powered by a much faster and more efficient Broadcom BCM2710A1 processor, which is a quad-core ARM Cortex-A53 CPU clocked at 1.5 GHz. In contrast, the Raspberry Pi Zero W uses a single-core BCM2835 processor clocked at 1 GHz.
- Memory: The Raspberry Pi Zero 2 W has twice the amount of RAM as the Raspberry Pi Zero W, with 512 MB of LPDDR2 SDRAM compared to 256 MB on the original Zero W.
- Connectivity: The Raspberry Pi Zero 2 W has built-in Wi-Fi and Bluetooth 5.0, which means it can connect to wireless networks and Bluetooth devices without requiring any additional adapters. The Raspberry Pi Zero W also has Wi-Fi and Bluetooth but is limited to Bluetooth 4.1 and 2.4 GHz Wi-Fi.
- Power consumption: The Raspberry Pi Zero 2 W has a slightly higher power consumption than the Raspberry Pi Zero W, drawing up to 3.3 W
the Raspberry Pi Zero 2 W is a significant improvement over the Raspberry Pi Zero W in terms of processing power, RAM, and connectivity, making it a better choice for more demanding projects.