AED 12.00
Description
The sound sensor acts like a microphone, The sensor will detect sound and output signals digitally only with a Schmitt trigger circuit. These sound sensors are affordable. it can be used to make clap-activated switches for your lights, monitor your pets, or do any other sound project.
Package Includes:
- 1 x Microphone Sound Detection Sensor Blue
Features:
- Power On LED light: LED1
- Electret Condenser Microphone (ECM) sensor
- Comparator Output LED: LED2, when sound reaches the threshold
- The built-in potentiometer can be used to adjust the DO threshold level
- Mounting screw hole.
Description:
The sound sensor acts like a microphone, detecting sound signals. The sensor will detect sound signals and deliver digital output. These sound sensors are affordable and simple to operate. You can use them to make clap-activated switches for your lights monitor your pets, or do any other project that relies on sound detection.
Principle of Work:
Sound waves are created when you speak into the microphone and when they hit the diaphragm, they cause it to vibrate.
The plates shift closer or farther apart when the diaphragm trembles in response to sound, altering the capacitance. A voltage is created across the plates as a result, which we can measure to determine the sound's volume. and this sound sensor is a small circuit board with a microphone (50Hz-10kHz) and circuitry for converting sound waves into electrical signals. This electrical signal is fed into the onboard LM393 High Precision Comparator, which digitizes it and makes it available through the OUT pin. The module includes a potentiometer for adjusting the sensitivity of the OUT signal. You can use it to provide a threshold such that the module outputs LOW if the volume of the sound exceeds the threshold, otherwise HIGH. This configuration is suitable for initiating an action when a specific threshold is met. For example, if the volume of the sound surpasses a threshold and a knock is heard, you can trigger a relay to control the light.
The module includes a potentiometer for adjusting the sound level threshold, above which the module outputs LOW and the status LED illuminates. To establish the threshold, place your finger near the microphone and adjust the potentiometer until the Status LED on the module blinks in response to your clicks.
Pinout of the Module:
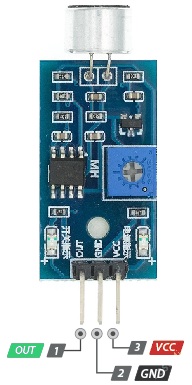
- Pin Vcc: provides power to the sensor The sensor should be powered between 3.3V and 5V.
- Pin GND: Ground
- Out: Digital output, When there is no sound, the pin outputs HIGH; when there is sound, the pin outputs LOW. It can be directly connected to any digital pin on an Arduino or to a 5V relay.
Two LEDs are also integrated into the module. When the module is turned on, the Power LED turns on, and when the sound level rises beyond the threshold value, the Status LED turns on.
Applications:
- Clap-controlled projects
- Sensitive LED lights.
- Animal sound-activated applications
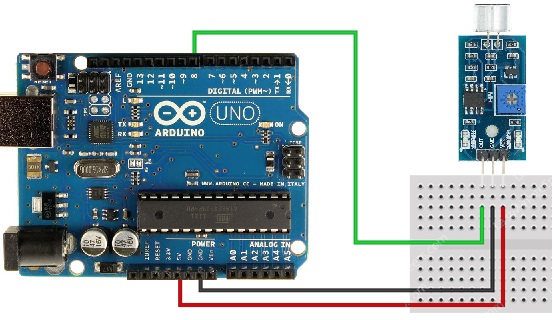
Circuit:
Connections are rather easy. Start by attaching the GND pin to the ground and the VCC pin of the module to the Arduino's 5V pin.
The OUT pin should then be connected to Arduino digital pin #8.
Library:
This Module doesn't need a library to work.
Code:
When claps or snaps are detected, for instance, a message is displayed on the serial monitor. If 25ms has passed since the last LOW state, it means that the clap is detected and not due to any spurious sounds
#define sensorPin 7

// Variable to store the time when last event happened
unsigned long lastEvent = 0;

void setup() {
  pinMode(sensorPin, INPUT);  // Set sensor pin as an INPUT
  Serial.begin(9600);
}

void loop() {
  // Read Sound sensor
  int sensorData = digitalRead(sensorPin);

  // If pin goes LOW, sound is detected
  if (sensorData == LOW) {


    if (millis() - lastEvent > 25) {
      Serial.println("Clap detected!");
    }

    // Remember when last event happened
    lastEvent = millis();
  }
}
When the clap is detected, output ought to appear on the serial monitor if everything is operating as it should.
Technical Details:
- Mounting screw hole size: 3mm
- Comparator Circuit: LM393
- Power supply voltage: +5V
- Circuit Board Dimensions: 35mm x 15mm x 14mm (L x W x H, excluding connector and microphone)
- Color: Blue.
Resources:
Comparisons:
This module is perfect for clap projects you don't even need to use an Arduino you can connect a relay directly to the module, the model has only a digital output connected to the Schmitt circuit on board which you can control its threshold using a pot but still, this can limit this module functionality which you can't use it to only amplify a normal sound and then use it as analog input so if you want analog input you can check this item.