AED 49.00
Description
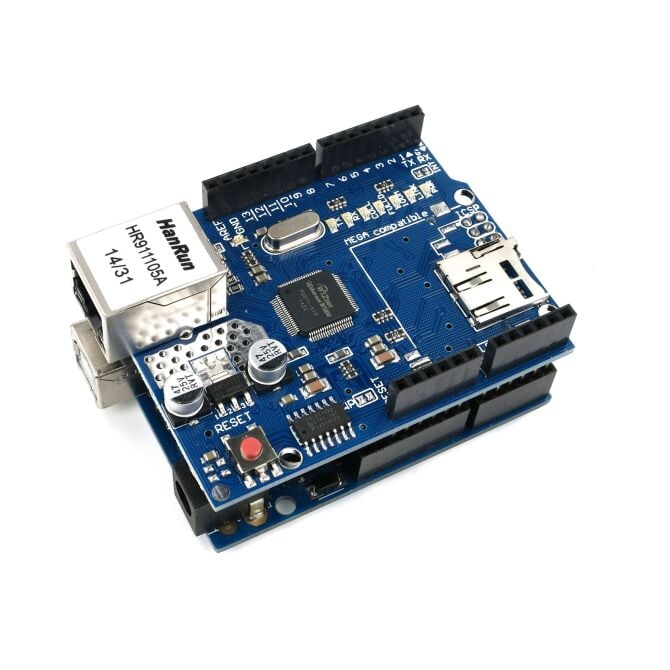
The Ethernet Shield W5100 Network Board is an add-on board for Arduino microcontrollers that provides Ethernet connectivity. It uses the Wiznet W5100 Ethernet chip to handle network communications and supports the TCP/IP protocol. The board features an RJ45 Ethernet jack, and a microSD card slot, and supports up to four simultaneous socket connections. It can be used to create network-connected devices such as web servers, IoT devices, and remote sensors.
Package Includes:
- 1 x Ethernet Shield W5100 Network Board
Features:
- Ethernet Connectivity: The board provides a wired Ethernet connection through an RJ45 jack.
- Wiznet W5100 Chip: The board uses the Wiznet W5100 Ethernet chip as the network controller, which supports the TCP/IP protocol.
- Multiple Socket Connections: The board can manage up to four simultaneous socket connections, allowing the microcontroller to communicate with multiple devices or applications at the same time.
- MicroSD Card Slot: The board has a built-in microSD card slot, which can be used for storing and retrieving data or media files over the network.
- Compatible with Arduino: The Ethernet Shield W5100 is compatible with most Arduino boards, making it easy to add Ethernet connectivity to an existing Arduino project.
- Easy to Use: The board is easy to use and comes with libraries and examples that make it easy to communicate with the board using Arduino programming language.
- Wide Range of Applications: The Ethernet Shield W5100 is suitable for a wide range of applications, including web servers, IoT devices, remote sensors, and other network-connected projects.
Description:
The Ethernet Shield W5100 Network Board is an expansion board designed to provide Ethernet connectivity for Arduino microcontrollers. It utilizes the Wiznet W5100 Ethernet chip, which enables the board to support TCP/IP communication protocols for network connectivity. This shield offers a fast and easy way to establish network connectivity for your Arduino project, allowing you to control or monitor your devices remotely over a LAN or the internet. The Ethernet Shield W5100 features an RJ45 Ethernet jack for wired connection to the network and supports up to four simultaneous socket connections, which can be used for different applications such as sending and receiving data, managing remote sensors, or controlling relays. Additionally, the board has a microSD card slot which can be used for storing and retrieving data or media files over the network. The Ethernet Shield W5100 is commonly used for building web servers, IoT devices, remote monitoring systems, and other network-connected projects. It can be easily integrated into an existing project, and there are many libraries available that make it easy to communicate with the board using Arduino programming language.
Principle of Work:
The Ethernet Shield W5100 Network Board operates using the Wiznet W5100 Ethernet chip to provide Ethernet connectivity for an Arduino microcontroller. The W5100 chip acts as a network controller, handling the communication between the Arduino and the Ethernet network. When the Ethernet Shield W5100 is connected to an Ethernet cable and powered up, the W5100 chip initializes and establishes a network connection using the TCP/IP protocol. The board uses the standard Ethernet library in the Arduino programming environment, which allows the Arduino to send and receive data over the network using TCP or UDP protocols. The W5100 chip manages multiple socket connections, allowing the board to simultaneously communicate with multiple devices or applications. The microcontroller can send or receive data using a specific socket, and the W5100 chip handles the routing of the data to the intended recipient. The Ethernet Shield W5100 also has a built-in microSD card slot, which can be used for storing and retrieving data over the network. The microcontroller can read or write data to the microSD card using standard file I/O functions in the Arduino programming language.
Pinout of the Module:
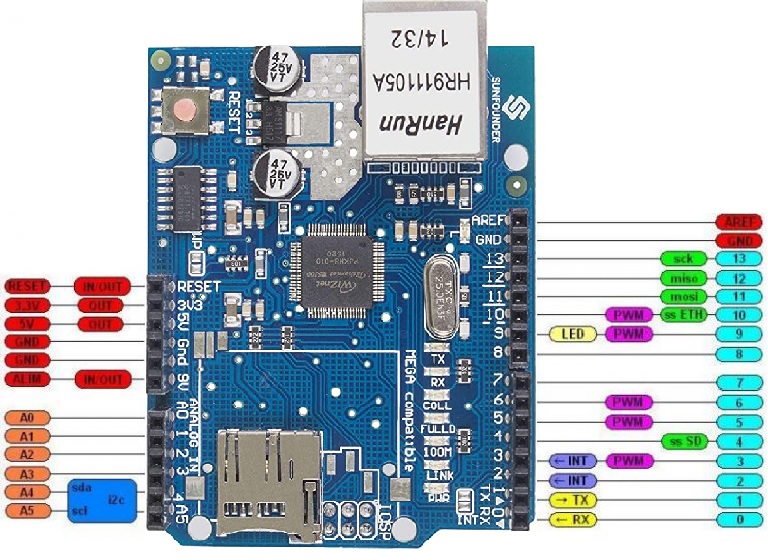
- Digital Pins: D4, D10, D11, D12, and D13 are used for communication with the W5100 Ethernet chip and controlling the board.
- Analog Pins: A0 is used for reading the status of the Ethernet connection and A1 can be used as an extra digital input/output pin.
- ICSP Header: This header is used for programming the microcontroller and for resetting the board.
- Ethernet Jack: The RJ45 jack provides the Ethernet connection for the board.
- MicroSD Card Slot: The microSD card slot is used for storing and retrieving data or media files over the network.
- Power Pins: The board can be powered by either the Arduino or an external power source. The Vin pin can accept a voltage input between 7-12V, while the 5V pin outputs regulated 5V power to the Arduino.
- Reset Button: The reset button resets the board when pressed.
Applications:
- Web Server: The board can be used to build a web server that allows users to access and control a device or application remotely over the internet.
- IoT Devices: The board can be used to create IoT devices that can connect to a network and exchange data with other devices or applications.
- Home Automation: The board can be used to control home appliances, such as lights, fans, or HVAC systems, over the network.
- Remote Sensors: The board can be used to collect data from remote sensors, such as temperature or humidity sensors, and transmit the data over the network.
- Industrial Control Systems: The board can be used to control or monitor industrial equipment and processes over the network.
- Robotics: The board can be used in robotics projects that require network connectivity for controlling or monitoring the robot.
Circuit:
You just plug the shield on the Arduino UNO or Mega and you are good to go.
Library:
No library needed to be installed.
Code:
example code using the Ethernet Shield W5100 Network Board and Arduino Uno that retrieves the current GMT time from a website and prints it on the serial monitor:
#include "SPI.h"
#include "Ethernet.h"

byte mac[] = { 0xDE, 0xAD, 0xBE, 0xEF, 0xFE, 0xED }; // MAC address of Ethernet Shield
IPAddress ip(192, 168, 1, 177); // IP address of Ethernet Shield
EthernetClient client; // Client object for connecting to time server

void setup() {
  Serial.begin(9600);
  while (!Serial) {} // Wait for serial port to connect

  Ethernet.begin(mac, ip);
  Serial.println("Ethernet connected");
}

void loop() {
  if (client.connect("worldtimeapi.org", 80)) { // Connect to time server
    Serial.println("Connected to time server");

    client.println("GET /api/timezone/Etc/UTC HTTP/1.1"); // Send HTTP request
    client.println("Host: worldtimeapi.org");
    client.println("Connection: close");
    client.println();

    while (client.connected()) { // Wait for response from time server
      if (client.available()) { // If response received from time server
        String line = client.readStringUntil('\r'); // Read response line by line
        if (line.indexOf("datetime") != -1) { // Search for datetime line
          String datetime = line.substring(22, 42); // Extract datetime value
          Serial.print("The current GMT time is: ");
          Serial.println(datetime); // Print the current GMT time
        }
      }
    }
    client.stop(); // Disconnect from time server
  }
  delay(1000); // Wait for one second before repeating
}
Note that this code retrieves the current GMT time from the website "worldtimeapi.org". You can modify the code to retrieve the time from a different website if you prefer.
And, this is how the code works:
- The first two lines of code include the necessary libraries for using the Ethernet Shield and the SPI interface.
- The next line defines the MAC address of the Ethernet Shield using a byte array.
- The next line defines the IP address of the Ethernet Shield using an IPAddress object.
- The next line creates an EthernetClient object called "client" that will be used to connect to the time server.
- The setup() function initializes the serial communication and the Ethernet Shield using the Ethernet.begin() method, which takes the MAC address and IP address as arguments.
- The loop() function contains the main logic of the program. First, it checks if the client is connected to the time server using the client.connect() method. If the connection is successful, it sends an HTTP request to the time server using the client.println() method, specifying the API endpoint, the hostname, and the connection type.
- The loop() function then enters a while loop that waits for a response from the time server using the client.available() method. If a response is received, it reads the response line by line using the client.readStringUntil() method and searches for the line containing the current datetime value using the line.indexOf() method.
- Once the datetime value is found, the loop() function extracts it using the line.substring() method, prints it on the serial monitor using the Serial.println() method, and disconnects from the time server using the client.stop() method.
- Finally, the loop() function
Technical Details:
- Ethernet controller: Wiznet W5100 with internal buffer memory
- Supports up to four simultaneous socket connections
- Supports TCP, UDP, and IP protocols
- Supports full-duplex communication at 10/100Mbps
- 3.3V operation with 5V tolerant inputs
- Compatible with Arduino Uno, Mega, and other compatible boards
- Shield size: 70mm x 55mm x 23mm (L x W x H)
- Weight: 25g
- Power consumption: 200mA typical, 300mA maximum
Resources:
Comparisons:
Both Ethernet Shield W5100 Network Board and the Ethernet Shield W5500 Network board are compatible with Arduino Uno, Mega, and other compatible boards, and support TCP, UDP, and IP protocols. The main difference is the Ethernet controller chip used on each board. The W5100 chip is an older model, while the W5500 is a newer, more advanced model.
Some of the differences between the two boards:
- The W5500 chip has a larger buffer memory than the W5100, which allows it to handle larger data transfers more efficiently.
- The W5500 supports IPv6 in addition to IPv4, while the W5100 only supports IPv4.
- The W5500 has a more advanced hardware TCP/IP stack, which reduces the load on the host microcontroller and allows for faster data transfer rates.
- The W5500 supports up to eight simultaneous socket connections, while the W5100 supports up to four.
- The W5500 is more power-efficient than the W5100, consuming less power during operation.
- The W5500 is generally more expensive than the W5100.