AED 22.50
Description
The BME280 is a precision sensor lets you quickly start measuring relative humidity, temperature, barometric pressure, and altitude thanks to this sensor's ease of use, pre-calibration, and lack of additional parts. it can be used in a variety of applications, including altitude measurement and weather monitoring. the BME280 sensor uses I2C or SPI communication protocol to exchange data with an MCU.
Package Includes:
- 1x Pressure Temperature Sensor Module GY-BME280 5V
Features:
- The module has an average consumption current is 0.1uA in sleep mode.
- At 1 Hz of frequency, the module consumes the current from 1.8uA to 3.6uA.
- For humidity, it has a response time of about 1sec
- For pressure, it has an RMS noise f 0.2Pa.
- The temperature coefficient offset for pressure is 1.5Pa/k
- the module has the 12C and SPI interface.
Description:
Because of its simplicity, pre-calibration, and lack of additional components, the BME280 precision sensor enables you to quickly begin measuring relative humidity, temperature, barometric pressure, and altitude. Numerous uses for it exist, including altitude measurement and weather monitoring. To exchange data with an MCU, the BME280 sensor uses the I2C or SPI communication protocol.
A pressure range of 300 to 1100 psi can be accurately estimated by the sensor. The temperature range also extends from -40 to 80 degrees Celsius. Furthermore, it has a 3% accuracy rate and can measure humidity on a scale from 0% to 100%.
Principle of Work:
The module has a straightforward two-wire I2C interface that is simple to connect to any microcontroller's I2C pins. The default I2C address of Locates the solder jumper beside the chip to change its I2C address.
By default, the left pad is linked to the middle copper pad. Therefore, to separate the connections between the left copper pad and the middle copper pad, you must scratch them. After that, you can add a solder blob to connect the right copper pad to the middle copper pad. It lets you change the I2C address, which is 0x77.
This module comes with three modes :
- Sleep mode
- Forced mode
- Normal mode
When the sensor is activated, the sleep mode is automatically selected. The sensor continues to operate in this mode at the lowest power consumption while no measurements are made. Additionally, you can read the chip-ID and compensation coefficients and access all registers.
In the forced mode, there is only one measurement. After the measurement, the sensor returns to its default sleep state. Before choosing the forced mode once more for the subsequent measurement, the data registers store the measurement results. Applications that require host-based synchronization and a low sampling rate are well suited for the forced mode.
In the Normal mode, an automated continuous cycle is used to alternate between the standby period and the measurement period. Recognize that the standby period current is a little lower than the sleep mode current. The determined measurement results can be obtained from data registers once the normal mode is enabled.
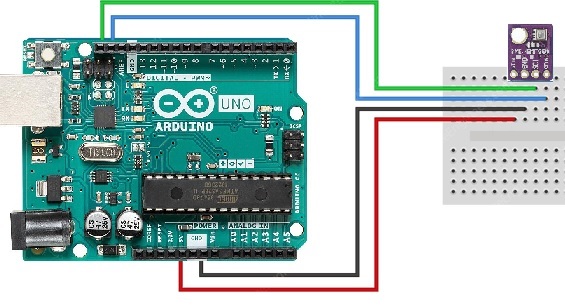
Pinout of the Board:

- VCC is the power supply for the module which can be anywhere between 3.3V to 5V.
- GND should be connected to the ground of Arduino.
- SCL is a serial clock pin for the I2C interface.
- SDA is a serial data pin for the I2C interface.
Applications:
- Context awareness, e.g. skin detection, room change detection
- Health monitoring/well-being
- Home automation control
- Control heating, ventilation, air conditioning (HVAC)
- Internet of things
- GPS enhancement & Indoor/Outdoor navigation
- Weather forecast
- Vertical velocity indication (rise/sink speed)
Circuit:
We are working with the I2C communication pins. the I2C pins on each Arduino Board vary, and they must be connected correctly. The SDA (data line) and SCL (clock line) are located on the pin headers close to the AREF pin on Arduino boards with the R3 layout. They also go by the names A5 (SCL) and A4 (SDA).
The connection between the Module and all kinds of boards:
| Type | SCL | SDA |
| Arduino Uno | A5 | A4 |
| Arduino Nano | A5 | A4 |
| Arduino Mega | 21 | 20 |
| Leonardo/Micro | 3 | 2 |
Library:
2 libraries needed
download it to a known location on your computer. Then open Arduino IDE and go to Sketch > Include Library > Add.zip library. Then navigate to the location (You downloaded the file). And open it. After successful installation, you'll get a message that "Library added to your libraries. Check include library menu"
Code:
Reading Temperature and Barometric Pressure with the BMP180 module
 #include |Wire.h"
#include "Adafruit_Sensor.h"
#include "Adafruit_BME280.h"
#define SEALEVELPRESSURE_HPA (1013.25)
Adafruit_BME280 bme;
void setup() {
Serial.begin(9600);
if (!bme.begin(0x76)) {
Serial.println("Could not find a valid BME280 sensor, check wiring!");
while (1);
}
}
void loop() {
Serial.print("Temperature = ");
Serial.print(bme.readTemperature());
Serial.println("*C");
Serial.print("Pressure = ");
Serial.print(bme.readPressure() / 100.0F);
Serial.println("hPa");
Serial.print("Approx. Altitude = ");
Serial.print(bme.readAltitude(SEALEVELPRESSURE_HPA));
Serial.println("m");
Serial.print("Humidity = ");
Serial.print(bme.readHumidity());
Serial.println("%");
Serial.println();
delay(1000);
}
You should see an output in the serial monitor.
Technical Details:
- Supply Voltage: 1.8 - 5V DC
- Humidity: 0-100%
- Pressure: 300-1100 hPa
- Temperature: 0.01°C
- Interface: I2C (up to 3.4MHz)
- Operational Range:
- Temperature: -40 to +85°C
- Humidity: 0.008%
- Pressure: 0.18Pa
- Temperature: ±1°C
- Humidity: ±3%
- Pressure: ±1Pa
- I2C address
- Item size:13x 11x1mm
Resources:
Comparisons:
As barometric sensors, the BME280 and BMP180 measure atmospheric pressure. A temperature and a humidity sensor are also included in the BME280, and a temperature sensor is included in the BMP180. These sensors can also be used to calculate altitude because pressure varies with altitude. The BMP180 only measures from 0 to 65 degrees Celsius, whereas the BME280 has a wider measurement range of -40 to 85 degrees Celsius. The BME280 module self-heats a little bit, so the temperature readings may be one or two degrees higher than the actual temperature. While the BMP180 can only use I2C communication, the BME280 can communicate using either the I2C or SPI protocol but this version is only I2C. Although the BME280 sensor costs more, it offers more features. You could use this sensor alone to create a weather station project, for instance. However, you can purchase a less expensive temperature sensor if you're not interested in measuring the pressure or humidity. Thanks to the Adafruit libraries, connecting these sensors to Arduino, ESP8266, and ESP32 is a breeze.
for comparisons with other sensors look at the table:
| Sensor | DHT11 | DHT22 (AM2302) | LM35 | DS18B20 | BME280 | BMP180 |
| Measures | Temperature Humidity |
Temperature Humidity |
Temperature | Temperature | Temperature Humidity Pressure |
Temperature Pressure |
| Communication protocol |
One-wire | One-wire | Analog | One-wire | I2C SPI |
I2C |
| Supply voltage |
3 to 5.5V DC | 3 to 6V DC | 4 to 30 V DC | 3 to 5.5V DC | 1.7 to 3.6V (for the chip) 3.3 to 5V for the board |
1.8 to 3.6V (for the chip) 3.3 to 5V for the board
|
| Temperature range |
0 to 50ºC | -40 to 80ºC | -55 to 150ºC | -55 to 125ºC | -40 to 85ºC | 0 to 65ºC |