AED 8.20
Description
This IR Controller (Infrared Remote Control) allows you to simply create remote control projects. It has 17 buttons, a range of up to 8 meters, and an effective angle of 60 degrees. It is also compatible with any generic IR receiver. By Transmitting and decoding a signal in the form of pulsed IR radiation, an IR remote and receiver can communicate with one another. With wavelengths ranging from 700 nm to 1 mm, infrared radiation (IR), often known as infrared light, is a kind of electromagnetic radiation. IR radiation is invisible to the human eye since humans can only perceive light with wavelengths of approximately 400 (violet) to 700 (red).
Specifications:
- The sensor uses HX1838, high sensitivity.
- Operating voltage 5V.
- Output form: Digital output.
- VCC: 3.3V-5V external voltage (can be directly connected to the 5v microcontroller and 3.3v microcontroller).
Note Kit theory test distance of about 5-8 meters, but the practical application depends on the environmental factors you use, as well as the nearby barrier (such as membrane, glass, obstacles or other material blocking), receiving head with HX1838 with power work instructions lights, receive 38K frequency each remote control encoding data.
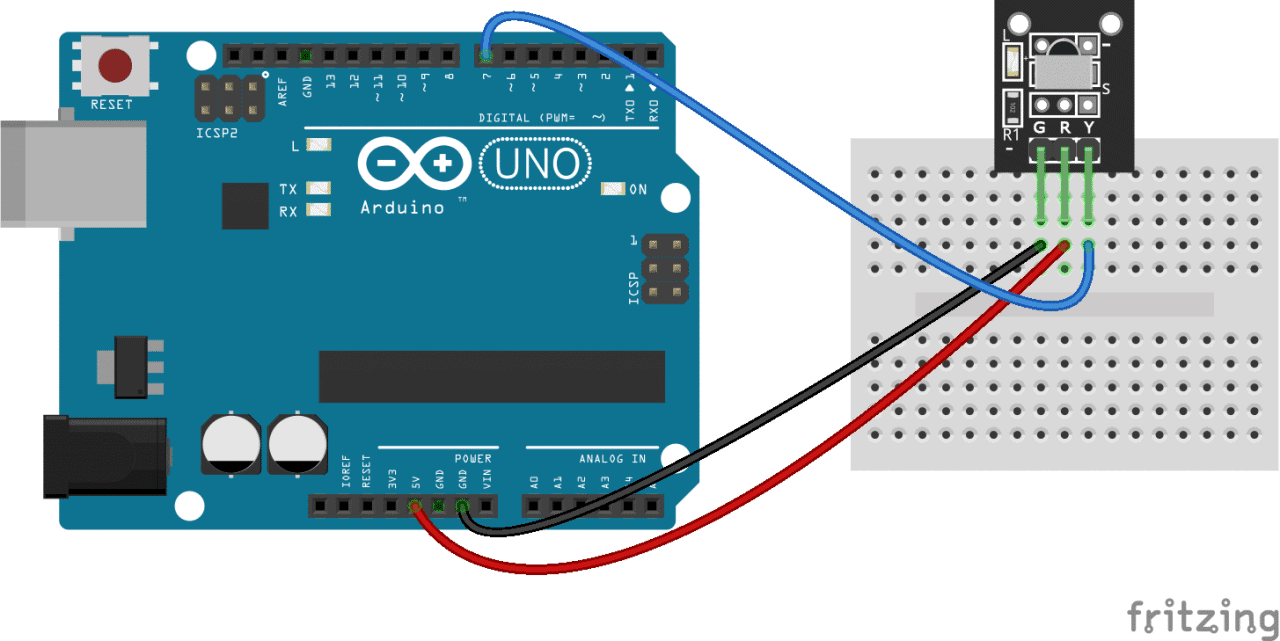
IR receiver connections
| IR receiver | Arduino |
|---|---|
| OUT (left) | Pin 2 |
| GND (middle) | GND |
| Vcc (right) | 5 V |
Package includes:
- 1x IR Remote
- 1x IR Receiver Module
- 3x DuPont Wire
HOW IR RECEIVERS AND REMOTES WORK
An IR transmitter and an IR receiver are required for a simple infrared communication system. The transmitter resembles a regular LED, except it emits light in the infrared range rather than the visible spectrum. The IR transmitter LED can be found on the front of a TV remote control:
In IR transmitter breakout boards for the Arduino, the same sort of LED is utilized. It's seen on the front of this Keyes infrared transmitter:
The IR receiver transforms IR light into an electrical signal using a photodiode and a pre-amplifier.
WHAT ARE IR CODES:
A unique hexadecimal code is produced each time you push a button on the remote control. This is the data that is modulated and delivered to the receiver through IR. The receiving microcontroller has to know which code corresponds to each key on the remote in order to decode which key is pushed.
Because various remotes create different codes for keypresses, you'll need to figure out what code your remote generates for each key. The IR key codes should be given on the datasheet if you can locate them. If not, a simple Arduino program can read the most common remote controllers and display the hexadecimal codes to the serial monitor when a key is pressed. In a moment, I'll show you how to do that, but first, we need to connect the receiver to the Arduino...
HOW DO YOU USE AN IR RECEIVER WITH AN ARDUINO?
IR receivers come in a variety of shapes and sizes, some of which are standalone and others that are placed on a breakout board. Because the pins on your IR receiver may be configured differently from the HX1838 IR receiver and remote set we're utilizing here, check the datasheet for your specific IR receiver. All IR receivers, on the other hand, will have three pins: signal, ground, and Vcc.
THE IR RECEIVER PROGRAMMING
After you've connected the receiver, you can install the Arduino library and begin programming. I'll teach you how to identify the codes transmitted by your remote, how to figure out what IR protocol your remote uses, how to print key presses to a serial monitor or an LCD, and how to manipulate the Arduino's output pins using a remote in the examples below.
INSTALL THE REMOTE LIBRARY
We’ll be using the IRremote library for all of the code examples below. You can download a ZIP file of the library from here.
To install the library from the ZIP file, open up the Arduino IDE, then go to Sketch > Include Library > Add. ZIP Library, then select the IRremote ZIP file that you downloaded from the link above.
THE ARDUINO SAMPLE CODE FOR THE Remote Control Module Kit :
First, you'll need to To find the keycodes for your remote control, upload this code to your Arduino and open the serial monitor:
#include "IRremote.h"

const int RECV_PIN = 7;

IRrecv irrecv(RECV_PIN);

decode_results results;

void setup(){

Serial.begin(9600);

irrecv.enableIRIn();

irrecv.blink13(true);

}

void loop(){

if (irrecv.decode(&results)){

Serial.println(results.value, HEX);

irrecv.resume();

}

}
Now press each key on your remote and record the hexadecimal code printed for each keypress.
Using the program above, I derived a table of keys and their corresponding codes from the remote that came with my HX1838 IR receiver and remote set. Note that you will receive a 0XFFFFFFFF code when you press a key continuously.
| Key | Code |
| CH- | 0xFFA25D |
| CH | 0xFF629D |
| CH+ | 0xFFE21D |
| << | 0xFF22DD |
| >> | 0xFF02FD |
| >|| | 0xFFC23D |
| – | 0xFFE01F |
| + | 0xFFA857 |
| EQ | 0xFF906F |
| 100+ | 0xFF9867 |
| 200+ | 0xFFB04F |
| 0 | 0XFF6897 |
| 1 | 0xFF30CF |
| 2 | 0xFF18E7 |
| 3 | 0xFF7A85 |
| 4 | 0xFF10EF |
| 5 | 0xFF38C7 |
| 6 | 0xFF5AA5 |
| 7 | 0xFF42BD |
| 8 | 0xFF4AB5 |
| 9 | 0xFF52AD |
Then, print the keys values to the Serial Monitor by Uploading the next code:
#include "IRremote.h"
const int RECV_PIN = 7;
IRrecv irrecv(RECV_PIN);
decode_results results;
unsigned long key_value = 0;
void setup(){
 Serial.begin(9600);
 irrecv.enableIRIn();
 irrecv.blink13(true);
}
void loop(){
 if (irrecv.decode(&results)){
 if (results.value == 0XFFFFFFFF)
 results.value = key_value;
 switch(results.value){
 case 0xFFA25D:
 Serial.println("CH-");
 break;
 case 0xFF629D:
 Serial.println("CH");
 break;
 case 0xFFE21D:
 Serial.println("CH+");
 break;
 case 0xFF22DD:
 Serial.println("|<<");
 break;
 case 0xFF02FD:
 Serial.println(">>|");
 break ;
 case 0xFFC23D:
 Serial.println(">|");
 break ;
 case 0xFFE01F:
 Serial.println("-");
 break ;
 case 0xFFA857:
 Serial.println("+");
 break ;
 case 0xFF906F:
 Serial.println("EQ");
 break ;
 case 0xFF6897:
 Serial.println("0");
 break ;
 case 0xFF9867:
 Serial.println("100+");
 break ;
 case 0xFFB04F:
 Serial.println("200+");
 break ;
 case 0xFF30CF:
 Serial.println("1");
 break ;
 case 0xFF18E7:
 Serial.println("2");
 break ;
 case 0xFF7A85:
 Serial.println("3");
 break ;
 case 0xFF10EF:
 Serial.println("4");
 break ;
 case 0xFF38C7:
 Serial.println("5");
 break ;
 case 0xFF5AA5:
 Serial.println("6");
 break ;
 case 0xFF42BD:
 Serial.println("7");
 break ;
 case 0xFF4AB5:
 Serial.println("8");
 break ;
 case 0xFF52AD:
 Serial.println("9");
 break ;
 }
 key_value = results.value;
 irrecv.resume();
 }
}
If your remote sends different codes than the ones in the table above, just replace the hex code in each line where it says:
case 0xFFA25D:
Serial.println(“CH-“);
In these lines, when the hex code 0xFFA25D is received, the Arduino prints “CH-“.
This Video will help you get this Kit up and running :