AED 75.00
Description
The Keyestudio Leonardo is a powerful development board designed around the high-performance "ATmega32U4" MCU, serving as its core. With its integrated USB interface, this board offers unparalleled versatility, allowing users to effortlessly configure it as either a keyboard or a mouse when connected to a PC. Compared to the beloved Arduino Uno, the Keyestudio Leonardo boasts an impressive array of 20 digital input/output pins, with 7 of them featuring PWM (Pulse Width Modulation) capabilities, enabling precise control over various devices. Additionally, the board is equipped with 12 analog input pins, enabling seamless integration of analog sensors and expanding its potential for innovative projects. Whether you're a hobbyist, a tinkerer, or a seasoned electronics enthusiast, the Keyestudio Leonardo opens up a world of possibilities, empowering you to bring your creative ideas to life with ease and efficiency.
Package Includes:
- 1 x Keyestudio Leonardo R3 board
- 1 x Black Micro USB cable 1m
Features:
- Microcontroller: The board is powered by the ATmega32U4 microcontroller, offering high-performance computing capabilities for a wide range of applications.
- Operating Voltage: The board operates at 5 volts, making it compatible with various electronic components and accessories designed for 5V systems.
- Input Voltage Range: The board can accept an input voltage between 5V to 12V. If using 5V, connect it to the Vcc pin, and for voltages above 5V, input to the VIN pin.
- Micro USB Connection: The board features a micro USB interface, facilitating easy communication and programming with a computer.
- Analog Input Pins: There are 9 analog input pins, each capable of reading analog signals with a resolution of 10 bits, providing accurate measurement capabilities for analog sensors.
- Digital I/O Pins: The board offers 20 digital input/output pins, enabling connections to various external devices and components, and expanding the board's capabilities for projects.
- PWM Pins: Out of the 20 digital pins, 7 of them support Pulse Width Modulation (PWM), allowing precise control over devices such as motors, LEDs, and servos.
- RX/TX Serial Port: The board includes RX (receive) and TX (transmit) pins, enabling serial communication with other devices or a computer, facilitating data exchange and debugging.
- Flash Memory: The board is equipped with 32KB of Flash memory, providing ample storage space for storing program code and data.
- SRAM: The board features 2.5KB of Static Random Access Memory (SRAM), allowing the microcontroller to store and access data during program execution.
- Clock Speed: The board operates at a clock speed of 16MHz, ensuring efficient execution of instructions and smooth operation of the microcontroller.
- 5V Regulating Circuit: The board incorporates a 5V voltage regulator circuit, providing a stable 5V power supply to the microcontroller and connected components.
- Onboard LED: The board has a built-in LED connected to pin 13, allowing for easy visual feedback and testing during program execution.
Description:
The Keyestudio Leonardo is an advanced and feature-rich development board built around the highly capable "ATmega32U4" microcontroller. Its innovative design incorporates a convenient USB interface, allowing seamless configuration as either a keyboard or a mouse when connected to a PC, expanding its application possibilities. Outperforming the classic Arduino Uno, the Keyestudio Leonardo boasts an impressive array of 20 digital input/output pins, including 7 with PWM capabilities, granting precise control over motors, LEDs, and other PWM-compatible devices. Additionally, it offers 12 analog input pins, facilitating easy integration of various analog sensors for data collection from the physical world. One standout advantage is its support for UART serial communication via dedicated Rx and Tx pins. This direct access to the MCU's built-in USB functionality eliminates the need for an external serial converter, streamlining data exchange with other devices Built upon the foundations of Arduino.cc, the Keyestudio Leonardo embraces the principles of open-source development, empowering users with the freedom of to customize both hardware and software for their specific needs. Whether you're a beginner or an experienced maker, the Keyestudio Leonardo opens doors to a realm of creativity, innovation, and limitless project possibilities. Let your ideas take flight with the Keyestudio Leonardo at your side.
Principle of Work:
Internally, the Keyestudio Leonardo operates based on its core microcontroller, the "ATmega32U4." This microcontroller serves as the brain of the board, handling all the computational tasks and controlling various input and output operations. The "ATmega32U4" microcontroller comes with built-in Flash memory of 32KB, which is used to store the program code (sketch) that the board will execute. Additionally, it has 2.5KB of SRAM (Static Random Access Memory), which is used for temporarily storing data during the program's execution. The microcontroller operates at a clock speed of 16MHz, ensuring that it can process instructions and data at a high speed, making the board responsive and efficient in its operation. Externally, the board is equipped with a USB interface, allowing it to communicate with a computer. This USB interface provides several functionalities, including the ability to configure the board as either a keyboard or a mouse when connected to a PC. This feature adds versatility to the board and expands its potential applications. The board also boasts a rich set of input/output (I/O) options. It offers a total of 20 digital pins, which can be used for both input and output operations. Among these digital pins, 7 are equipped with Pulse Width Modulation (PWM) capabilities, allowing precise control over devices that support PWM. Additionally, the Keyestudio Leonardo includes 12 analog input pins, enabling it to read analog signals from sensors. These analog input pins facilitate the integration of various sensors, such as temperature sensors, light sensors, and more, allowing the board to interact with its environment and collect data from the physical world. also, the board supports UART (Universal Asynchronous Receiver/Transmitter) serial communication through dedicated Rx (receive) and Tx (transmit) pins. This allows the board to exchange data with other devices or a computer, enabling seamless communication in various projects. The board's internal components and functionalities work together cohesively, enabling the Keyestudio Leonardo to be a versatile and powerful development board suitable for a wide range of projects and applications. Its combination of a capable microcontroller, extensive I/O options, and USB interface makes it an ideal choice for makers, hobbyists, and developers looking to bring their creative ideas to life.
Pinout of the Module:
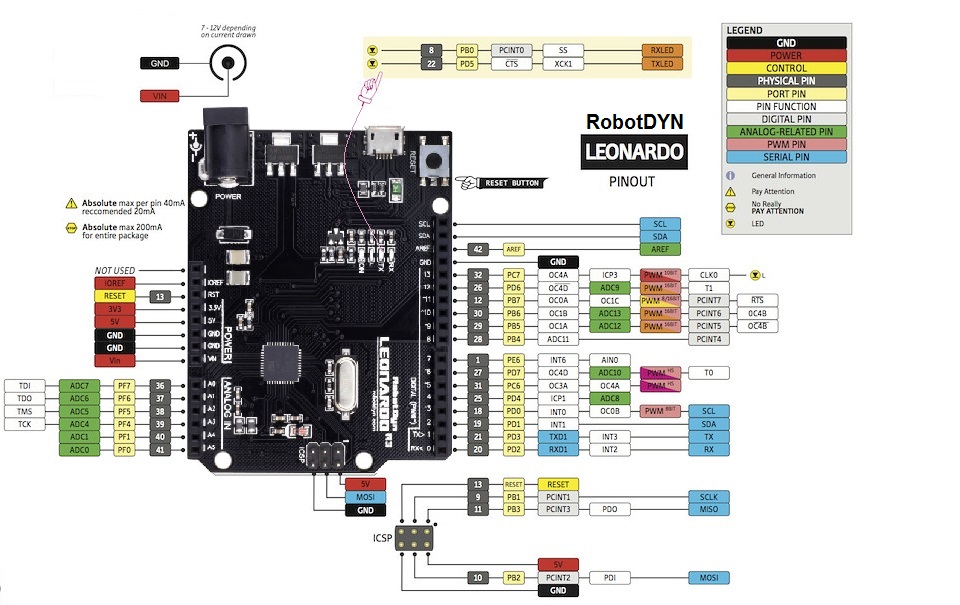
- Digital I/O Pins: These pins can be used for both input and output operations. They are labeled D0 to D13 and A0 to A5 (also referred to as D18 to D23). If you need more digital pins, you can also use the ICSP pins (MISO, SCK, and MOSI) for additional digital I/O.
- Analog Input Pins: The board has 6 analog input pins labeled A0 to A5. Additionally, it has 6 more analog inputs on digital pins D4, D6, D8, D9, D10, and D12. Each analog input can measure values between 0 and 5 volts, providing 1024 different values for precise readings from sensors.
- PWM Pins: The board has 7 pins capable of Pulse-Width Modulation (PWM). These are labeled D3, D5, D6, D9, D10, D11, and D13. PWM allows you to control the intensity of devices like LEDs or motors with the analogWrite() function.
- External Interrupt Pins: The board has 5 pins (D3, D2, D0, D1, and D7) that can be configured to trigger an interrupt when certain conditions are met. This allows you to respond quickly to external events.
- Serial Communication Pins: The board has 2 pins (D0 for receiving data, and D1 for transmitting data) for serial communication, enabling easy communication with other devices.
- SPI Communication: SPI communication is available through the ICSP header. However, unlike some other boards, the SPI pins are not connected to the digital I/O pins.
- AREF Pin: This pin is used to set the upper end of the analog input pins' voltage range. It can be used to configure the external reference voltage, which is typically 0 to 5 volts.
- IOREF Pin: This pin indicates the voltage at which the board's I/O pins are operating. For Leonardo, this voltage is 5 volts.
- Power Pins: A VIN pin can be used to power the board with an unregulated voltage between 7 to 12 volts. VCC is the regulated 5V voltage used by the board. RST is used to restart the Leonardo, and GND is the common ground reference for the board.
Applications:
- Prototyping and DIY Electronics: The board is ideal for hobbyists and makers to prototype and create their own electronic projects, from simple gadgets to complex automation systems.
- Robotics: The Keyestudio Leonardo's PWM support, digital and analog I/O pins, and serial communication make it well-suited for building and controlling robots, robotic arms, and autonomous vehicles.
- Home Automation: The board can be used to design home automation systems, enabling users to control lights, appliances, and security systems remotely.
- IoT (Internet of Things): With its USB interface and various communication options, the board can be used to create IoT devices that can interact with cloud services and other smart devices.
- Wearable Electronics: Due to its compact size and easy programmability, the Keyestudio Leonardo is suitable for wearable tech projects like smartwatches and fitness trackers.
- Interactive Art and Installations: The board's ability to work as a keyboard or mouse when connected to a PC allows for interactive art installations and multimedia projects.
- Data Acquisition and Monitoring: The board's analog input pins are useful for data acquisition from sensors, making it applicable in monitoring and measurement systems.
- Educational Tool: The Keyestudio Leonardo is an excellent educational tool for teaching programming, electronics, and microcontroller concepts in schools and workshops.
- Automation and Control Systems: Its digital and analog I/O pins enable the board to interface with various sensors and actuators, making it suitable for automation and control applications.
- Gaming and Virtual Reality: With its USB interface and programmability, the board can be utilized to create custom game controllers or interact with virtual reality systems.
- Environmental Monitoring: The board can be used to build environmental monitoring systems for measuring temperature, humidity, air quality, and more.
- Music and Audio Projects: The PWM pins allow for precise control over sound and can be used to create musical instruments and sound effects.
Circuit:
We will not need any circuit, in this testing code, we will Blink the onboard LED and print the status on the serial monitor.
Connecting with Arduino First Time
- Open Arduino IDE: If you haven't already, download the Arduino IDE from the official software page. Arduino IDE Download
- Connect the Board: Use a data USB cable to connect the Keyestudio Leonardo to your computer. The USB connection will power the board and allow the IDE to send instructions to it. Ensure you have a data USB cable, as charge-only cables will not work.
- Select the Board: In the Arduino IDE, click on "Tools" in the menu bar and choose the "Board" option. Hover over the "Board" row to see the installed board packages. Select "Leonardo" from the list to specify the board you are using.
- Select the Port: Under "Tools," locate the "Port" option. Choose the serial device of the Arduino board from the "Tools | Serial Port" menu. It is likely to be COM3 or higher.
- Upload a Sketch: Copy the code you want to upload to the board. Click the "Verify" button to check for errors. Then, click the "Upload" button to program the board with the sketch. Your sketch will start running on the board and will execute again each time the board is reset.
- Use Serial Monitor: To access the Serial Monitor, click on the icon in the upper right corner. This allows you to communicate with the board and monitor the output of your sketches.
Code:
A simple Arduino code for the Keyestudio Leonardo that blinks the onboard LED (pin 13) and displays the status on the Serial Monitor:
// Pin number for the onboard LED
const int ledPin = 13;

// Time interval for blinking (in milliseconds)
const unsigned long blinkInterval = 1000; // 1 second

// Variables to keep track of the LED status
bool ledState = false;
unsigned long previousMillis = 0;

void setup() {
  // Initialize the onboard LED pin as an output
  pinMode(ledPin, OUTPUT);

  // Start the Serial communication at 9600 baud rate
  Serial.begin(9600);
}

void loop() {
  // Get the current time
  unsigned long currentMillis = millis();

  // Check if it's time to change the LED state
  if (currentMillis - previousMillis >= blinkInterval) {
    // Save the current time for the next interval
    previousMillis = currentMillis;

    // Toggle the LED state
    ledState = !ledState;

    // Set the LED pin to the new state (ON or OFF)
    digitalWrite(ledPin, ledState);

    // Display the LED status on the Serial Monitor
    if (ledState) {
      Serial.println("LED is ON");
    } else {
      Serial.println("LED is OFF");
    }
  }
}
Copy and paste this code into your Arduino IDE, upload it to your Keyestudio Leonardo, and open the Serial Monitor (Tools > Serial Monitor) at 9600 baud rate. You'll see the LED blinking every second, and the status ("LED is ON" or "LED is OFF") will be displayed on the Serial Monitor accordingly.
Technical Details:
- CPU 8bit
- Microcontroller Atmega32u4
- Operating voltage 5V
- Input voltage max. 12V
- DC Current per I/O Pin: 40 mA (This is the current that can be sourced or sink into and out of the Input / Output pins)
- DC Current for 3.3V Pin: 50 mA
- PCB Dimensions: 71mm*54mm*15mm
- Weight: 18.4g
Resources:
Comparisons:
The Keyestudio Leonardo and Keyestudio Uno R3 are two popular Arduino-compatible development boards, both based on the ATmega microcontroller series. While they share similarities, they also have some distinct features:
- Microcontroller: Both boards use ATmega microcontrollers. The Keyestudio Leonardo is based on the ATmega32U4, while the Keyestudio Uno R3 uses the ATmega328P. The ATmega32U4 on the Leonardo has built-in USB communication capabilities, allowing it to act as a keyboard or mouse when connected to a PC.
- USB Interface: The Keyestudio Leonardo has a built-in micro USB interface, while the Keyestudio Uno R3 uses a standard USB type-B interface. The Leonardo's built-in USB allows for easier communication with the computer without the need for an external USB-to-serial converter.
- Digital I/O Pins: Both boards offer a similar number of digital I/O pins. The Keyestudio Leonardo has 20 digital I/O pins (D0-D13 and D18-D23), while the Keyestudio Uno R3 has 14 digital I/O pins (D0-D13).
- PWM Pins: Both boards support Pulse Width Modulation (PWM) on some of their digital pins. The Keyestudio Leonardo has 7 PWM pins, whereas the Keyestudio Uno R3 has 6 PWM pins.
- Analog Input Pins: The Keyestudio Leonardo and Keyestudio Uno R3 both provide 6 analog input pins (A0-A5). However, the Leonardo also offers an additional 6 analog input pins (A6-A11) on certain digital pins (D4, D6, D8, D9, D10, and D12).
- UART Serial Communication: Both boards support UART serial communication through dedicated Rx and Tx pins, allowing data exchange with other devices or a computer.
- Compatibility with Shields: Both boards are compatible with most Arduino shields, making it easy to extend their capabilities for various projects.
- Operating Voltage: Both boards operate at 5 volts, making them compatible with many standard electronic components and accessories.