AED 171.95
Description
The RobotDYN Leonardo is an advanced innovation centered around the "ATmega32U4" MCU at its core. This cutting-edge board boasts an integrated USB interface, empowering users to seamlessly switch between keyboard and mouse functionality when linked to a PC. Notably surpassing the capabilities of the RobotDYN Uno, this iteration offers an impressive array of 20 digital inputs/output pins. Among these, 7 are enhanced with PWM (Pulse Width Modulation) capabilities, while an additional 12 operate as versatile analog input pins.
Package Includes:
- 1 x RobotDYN Leonardo Ethernet Without POE
Features:
- ATmega32U4 Microcontroller: Powered by the efficient ATmega32U4 microcontroller.
- Wake-on LAN Power Off Modes: Supports Wake-on LAN Power Off modes for reduced power consumption, particularly with the W5500.
- Digital Input/Output: A total of 23 digital input/output ports for extensive connectivity.
- PWM Output: 7 ports enabled for precise Pulse Width Modulation (PWM) output.
- Analog Input/Output: 12 analog ports with 10-bit resolution (0 to 1023) for accurate analog signal handling.
- Hardware Interrupt Function: 5 ports equipped with hardware interrupt functionality for enhanced responsiveness.
- Network Connectivity: RJ45 interface for seamless network connectivity.
- USB Connectivity: Micro USB port for easy device connection and data transfer.
- Power Options: DC power jack for flexible power source selection.
- Additional SPI Bus Ports: 3 extra digital SPI bus ports (D14, D15, D16) for external device communication via SPI.
- microSD Card Support: microSD card socket for expandable storage and data handling.
- HID Device Functionality: Can function as a Human Interface Device (HID) for diverse interactive scenarios.
- Micro SD Card Logic Level Conversion: Equipped with a logic level converter for microSD card compatibility.
Description:
The RobotDyn Leonardo ETH(V2) is an ingenious amalgamation of two powerful components seamlessly integrated into a single board. This exceptional device amalgamates the capabilities of the ATmega32U4-based Leonardo with the Ethernet prowess of the WizNet W5500 TCP/IP controller. This convergence results in a comprehensive Ethernet-connected solution that opens doors to an array of possibilities. At its heart lies the Leonardo, driven by the ATmega32U4, which brings its microcontroller proficiency to the forefront. Complementing this is the Ethernet controller, a masterpiece powered by the WizNet W5500, a TCP/IP embedded Ethernet controller renowned for its adeptness. Within its compact design, the W5500 encapsulates a robust TCP/IP stack, 10BaseT/100BaseTX Ethernet functionality supporting both full and half duplex modes, and an all-encompassing ensemble of MAC and PHY elements. The synergy between the ATmega32U4 and the WizNet W5500 is seamlessly orchestrated through a highly efficient SPI protocol, functioning at 80MHz clocks. This orchestration ensures swift and steadfast connectivity, upholding the promise of high-speed communication between the two core components. Furthermore, the board boasts a microSD card socket, enhancing its utility by facilitating data storage that can be effortlessly transmitted across the network. This feature not only amplifies data management but also expands the board's potential applications.
Principle of Work:
The RobotDyn Leonardo ETH(V2) operates as a unified entity, blending the capabilities of the ATmega32U4 microcontroller and the WizNet W5500 Ethernet controller. These two components work in tandem to create a cohesive system that can execute a variety of tasks.
-
ATmega32U4 Microcontroller:
- The ATmega32U4 microcontroller serves as the board's "brain." It manages general processing tasks, I/O operations, and interfaces with various peripherals.
- It can execute custom code and handle user-defined functions, making it ideal for application-specific tasks.
- It communicates with the WizNet W5500 Ethernet controller through the SPI (Serial Peripheral Interface) protocol.
-
WizNet W5500 Ethernet Controller:
- The W5500 Ethernet controller manages network communication. It incorporates a TCP/IP stack, allowing the board to communicate seamlessly over Ethernet networks.
- It supports both 10BaseT and 100BaseTX Ethernet with full or half-duplex communication modes.
- The MAC (Media Access Control) and PHY (Physical Layer) components ensure accurate data transmission and reception.
-
SPI Communication:
- The ATmega32U4 and W5500 communicate through the SPI protocol. The ATmega32U4 acts as the master device, sending commands and receiving data from the W5500.
- This efficient communication protocol allows for high-speed data transfer between the two components.
-
microSD Card Socket:
- The microSD card socket enables data storage and retrieval from a microSD card.
- The ATmega32U4 can read and write data to the microSD card, making it a convenient option for data storage and transfer.
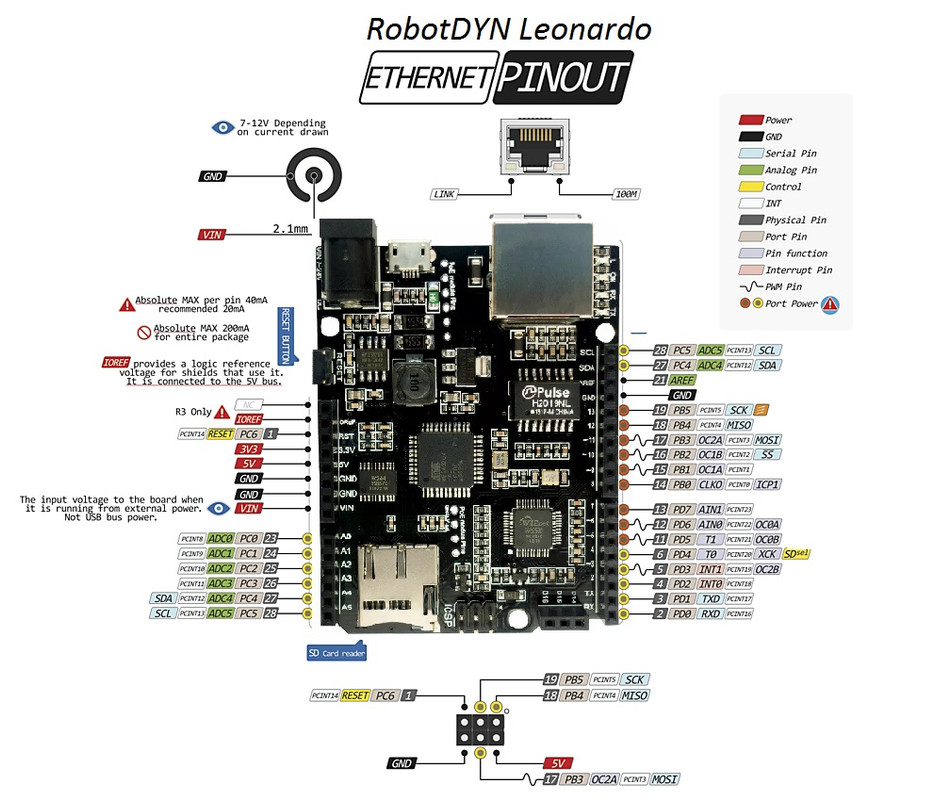
Pinout of the Module:
-
Digital and Analog Pins:
- Digital pins range from 0 to 13 and A0 to A5.
- Logic levels: "zero" (0 volts) and "one" (5 volts).
- Pull-up resistors can be enabled if required.
- A0 to A5 and A6 to A11 can also function as analog inputs or digital pins within the 0-5 volts range.
PWM Pins:
- PWM available on pins 3, 5, 6, 9, 10, 11, and 13.
- The 8-bit resolution is achievable using the analogWrite function.
SPI and UART Pins:
- SPI via ICSP connector.
- RobotDyn Leonardo ETH(V2) features three additional digital SPI bus ports: D14, D15, and D16.
- UART: RX (pin 0) and TX (pin 1) for data communication.
- Serial1 class used for external devices; Serial class when powered via USB.
TWI/I2C:
- Interaction with peripherals through asynchronous protocol.
- Two-wire connection using Wire library.
LED Indicators:
- RX and TX LEDs for data transmission.
- L (PIN 13) LED reflects parameter changes.
- ON LED indicates board power status.
Micro SD Card:
- MicroSD slot for data storage.
- ATmega32u4's digital port D4 (CS-CS2) for microSD.
- WizNet W5500 connects to digital port D10 (SS-CS2).
- SPI bus connects the Ethernet controller and microSD via ICSP connector (D14, D15, D16).
Reserved Pins:
- D4 for SD card selection.
- D9 for SD card detection.
- D10 for W5500.
- D14, D15, D16 for SPI.
- Optional: D8 for W5500 interrupt, D11 for W5500 initialization.
Additional Connectors:
- Micro-USB.
- External power supply (7 to 12 volts).
- ICSP connector for microcontroller programming.
Power Pins:
- VIN: Unregulated 7 to 12V power source (e.g., 9V battery or adapter).
- VCC: Regulated 5V for ATmega32U4; can be used to supply other devices if powered through Vin.
- RST: Active-low reset; connected to ground to initiate reset.
- GND: Common ground (0V reference).
- IOREF: Decodes ATmega32u4 voltage; adjusts power supply or applies level converter accordingly.
Applications:
-
Ethernet Connectivity:
- The integration of the WizNet W5500 Ethernet controller grants the board Ethernet connectivity, enabling communication and data exchange over local networks or the internet.
- Applications include remote data monitoring, IoT (Internet of Things) projects, and web-controlled devices.
-
Data Management:
- The microSD card socket offers a means to store and retrieve data. This is useful for recording sensor readings, logs, or any data that needs to be retained.
-
Customization:
- The ATmega32U4 can be programmed with custom code to perform specific tasks. This flexibility allows you to tailor the board's functionality to your project's requirements.
-
Networked Devices:
- The board can interact with other devices on the same network, making it suitable for scenarios involving device-to-device communication or control.
-
IoT Applications:
- With Ethernet connectivity and data storage, the board is well-suited for IoT projects, where devices communicate, share data, and operate remotely.
-
Automation and Control:
- Utilize the board to create automated systems or control devices remotely. This is applicable in home automation, industrial control, and robotics.
-
Prototyping and Development:
- The integrated features make the board an excellent platform for prototyping and developing projects that involve both microcontroller processing and network communication.
Circuit:
We will not need any circuit, we will blink the onboard LED.
Getting Started with the RobotDyn Leonardo ETH(V2)
1. Download and Open Arduino IDE:
- If you haven't already, download the Arduino IDE from the Arduino Software Page.
- Note: No external driver is needed, as everything is embedded within the Arduino IDE.
2. Connect the Board:
- Connect your RobotDyn Leonardo ETH(V2) board to your computer using a USB cable. Ensure it's a data USB cable that fits both the board and your computer. A charge-only cable won't work.
3. Select the Board:
- Open the Arduino IDE.
- Click on "Tools" in the menu bar.
- Locate and click on the "Board" row. If a board is already selected, it will be displayed here.
- Hover over the "Board" row to view the installed board packages.
- Click on "Leonardo" or "Leonardo Ethernet" to select the appropriate board.
4. Select the Serial Port:
- Click on "Tools" in the menu bar.
- Find the "Port" row and click on it. If a board is selected, the port will be displayed.
- Choose the serial device of your RobotDyn board from the "Tools | Serial Port" menu. It's likely to be something like COM3 or higher.
5. Upload a Sketch:
- Copy the code you want to upload to your board.
- Optionally, click the "Verify" button to compile the sketch and check for errors.
- Click the "Upload" button to program the board with the sketch.
- Your sketch will start running on the board and will run again whenever the board is reset.
6. Monitor Output:
- After uploading the sketch, you can monitor the output by clicking the "Serial Monitor" icon in the upper right corner of the Arduino IDE.
By following these steps, you can seamlessly start working with your RobotDyn Leonardo ETH(V2) board using the Arduino IDE.
Code:
This is a simple Arduino code example that blinks an LED on the RobotDyn Leonardo ETH(V2) board and sends a message to the Serial Monitor to indicate its status:
// Pin for the LED
const int ledPin = 13;

void setup() {
  // Initialize the LED pin as an output
  pinMode(ledPin, OUTPUT);

  // Start serial communication at 9600 bps
  Serial.begin(9600);
}

void loop() {
  // Blink the LED on and off
  digitalWrite(ledPin, HIGH);   // Turn on the LED
  Serial.println("LED ON");     // Print status message to Serial Monitor
  delay(1000);                  // Wait for 1 second
  digitalWrite(ledPin, LOW);    // Turn off the LED
  Serial.println("LED OFF");    // Print status message to Serial Monitor
  delay(1000);                  // Wait for 1 second
}
This code initializes the LED connected to pin 13 as an output and then repeatedly turns the LED on and off with a 1-second delay. It also sends messages to the Serial Monitor to indicate when the LED is turned on and off. Make sure to have your RobotDyn Leonardo ETH(V2) board connected to your computer and properly selected in the Arduino IDE before uploading this code. You can open the Serial Monitor in the Arduino IDE to view the status messages being printed.
Technical Details:
- Input Voltage (VIN/DC jack): 7~24V
- nbsp;Wiznet W5500
- PHY matches 10BaseT/100BaseTX Ethernet. Full and half duplex operating
- voltage 3.3V, 5V I/O signal tolerance
- TCP/IP protocols TCP, UDP, ICMP, IPv4, ARP, IGMP, PPPoEPHY
- clock speed 25MHz
- Power IN (USB): 5V-limit 500mA
- PCB Size: 53.3×68.6mm
- Weight: 41g
Resources:
Comparisons:
The RobotDyn Leonardo ETH(V2) board and the standard Leonardo board share a common foundation but have notable differences that set them apart. while both boards are based on the ATmega32U4 microcontroller, the RobotDyn Leonardo ETH(V2) distinguishes itself by integrating an Ethernet controller, which makes it particularly suitable for projects involving network communication, remote monitoring, and IoT applications. On the other hand, the standard Leonardo board offers a more traditional microcontroller setup, making it versatile for various projects but without the built-in Ethernet capabilities of the RobotDyn Leonardo ETH(V2):
RobotDyn Leonardo ETH(V2):
- Incorporates both the ATmega32U4 microcontroller and the WizNet W5500 Ethernet controller on a single board.
- Offers complete Ethernet connectivity, enabling communication over networks.
- WizNet W5500 provides a TCP/IP stack, facilitating Ethernet communication.
- Features additional digital SPI bus ports (D14, D15, D16) for extended communication options.
- Equipped with a microSD card socket for data storage and retrieval.
- Suitable for IoT projects, remote data monitoring, and web-controlled devices.
- Enables simultaneous integration of microcontroller processing and network communication.
Standard Leonardo:
- Contains the ATmega32U4 microcontroller as its core component.
- Does not have built-in Ethernet connectivity like the RobotDyn Leonardo ETH(V2).
- Suitable for a wide range of general-purpose projects and applications.
- Lacks the additional digital SPI bus ports and microSD card sockets.
- Doesn't offer out-of-the-box Ethernet communication capabilities.
- Ideal for projects not requiring network communication, offering a more straightforward setup.